How to Configure eDirectory and LDAP Authentication
Labels:
Overview
A key feature of the Palo Alto Networks firewall is mapping usernames to IP addresses. Once the Palo Alto Networks firewall knows the names associated with IP addresses, the firewall can:
- Log this information
- Control traffic based upon a particular username or group
The firewall uses two methods to perform username-to-IP address mapping, transparent and interactive authentication.
This document discusses configuring transparent authentication via an eDirectory server, and interactive authentication via an LDAP server. The discussion is in two parts:
- Transparently Obtaining User Authentication Information from eDirectory
- Using the LDAP server for authentication with captive portal, SSL VPN, or firewall GUI access
Before starting setup, we recommend having a local LDAP browser to verify the settings for the User-ID agent and the Palo Alto Networks firewall. Examples in this document are using JXplorer, a free, cross-platform LDAP browser downloadable here:http://jxplorer.org/.
Details
The Palo Alto Networks firewall uses two methods to map usernames to IP addresses:
- Transparent authentication: The firewall can automatically retrieve username and IP mappings from Active Directory domain controllers, using the Active Directory User-ID agent. In this case, the user previously logged into the domain, and so is not prompted for credentials by the firewall.
- Interactive authentication: The firewall can prompt for username, then authenticate via RADIUS or a local user database. This would apply if fusers are:
- Running Mac or Linux clients (called Captive Portal).
- Connecting to the firewall over our SSL VPN.
- Trying to log into the firewall GUI as an administrator.
The above methods are extended to include:
- Transparent authentication: The firewall can automatically retrieve username and IP mappings from Active Directory domain controllers (using the Active Directory User-ID agent) or from eDirectory servers (using the new eDirectory User-ID agent).
Note: The new User-ID agent is compatible with only eDirectory 8.8 due to the unique login information eDirectory tracks. - Interactive authentication: The firewall can prompt for username, then authenticate the user via RADIUS, a local user database, or an LDAP server.
Transparently Obtaining User Authentication Information from eDirectory
Novell’s eDirectory is a directory service that fully supports LDAP queries. With eDirectory, when a user authenticates, the source IP address and login time are stored in the directory in the fields: networkAddress (in a proprietary binary format) and loginTime. The new User-ID agent can specifically read this information and transparently map users to their IP addresses.
LDAP support in PAN-OS queries the directory, builds lists of groups for policies, and maps users to groups. Because of this, part of the process of implementing eDirectory support is configuring LDAP information on the Palo Alto Networks device.
Installing and Configuring the User-ID Agent
- Make sure to run Novell eDirectory 8.8 or later. The User-ID Agent uses some LDAP functions that are not available in previous versions of eDirectory.
- Install the new User-ID agent. Log into the support account at: https://support.paloaltonetworks.com. Go to Software Updates, then User Identification Agent section and look for a version that ends in “-LDAP.”
 Download this .msi file to the Windows server where the agent will run. Install the .msi file while logged in as an administrator. It will run as a local service under the local system account. The service name is User ID Agent, as shown here in the Services management console.
- After installed, launch the User-ID Agent and select Configure to display the following:
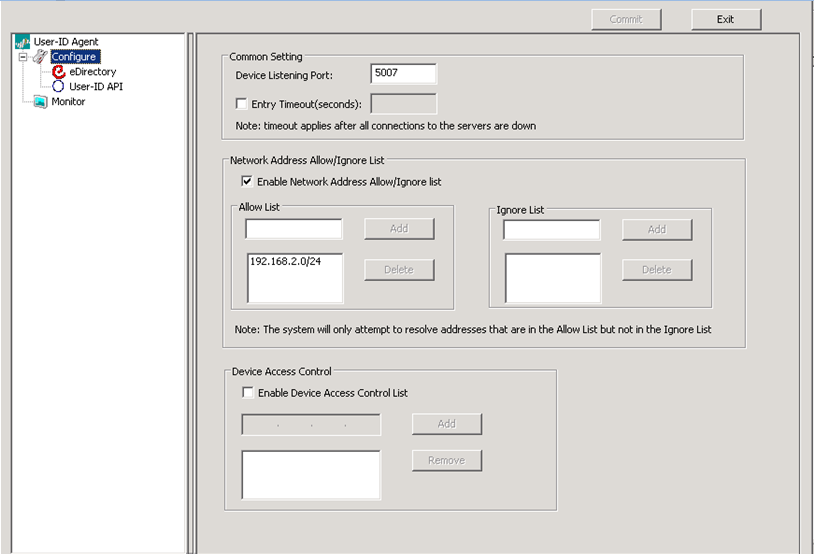
- Device Listening Port: Use the default. This port number is for communications between this agent and the PA firewall. Remember this port number when configuring the Palo Alto Networks firewall.
- Enable the Network Address Allow/Ignore list. Add the networks you want to monitor for User IDs. For terminal servers or other multi-user machines, add those IP addresses to the Ignore list, as we need to use the Terminal Services Agent to track users on those systems.
- Configure eDirectory settings. Select the eDirectory menu item on the left to display the following:
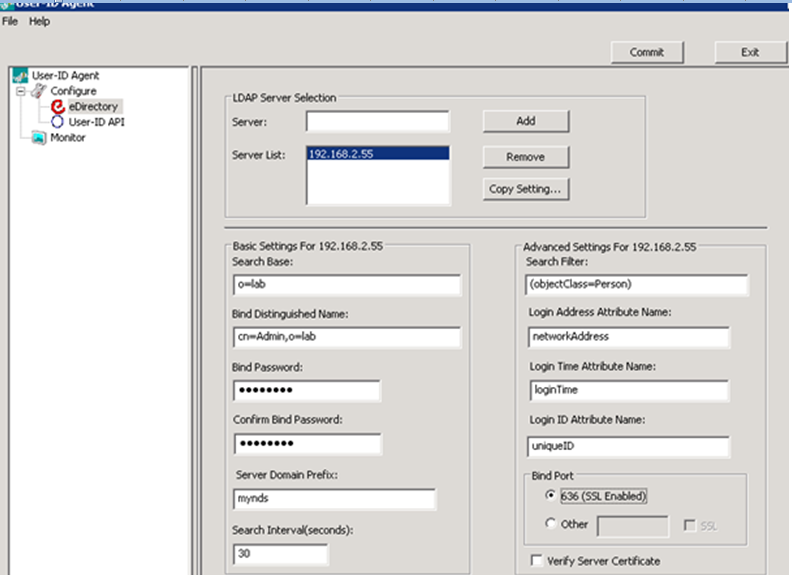 Complete the following:
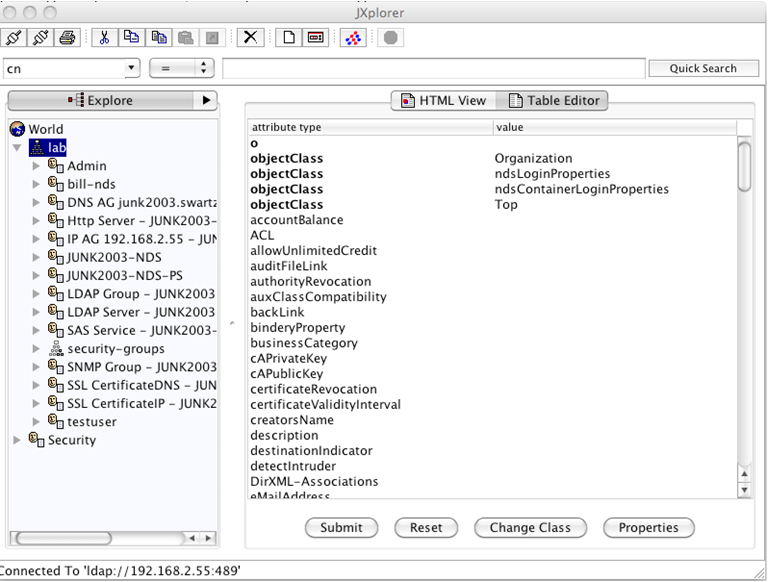
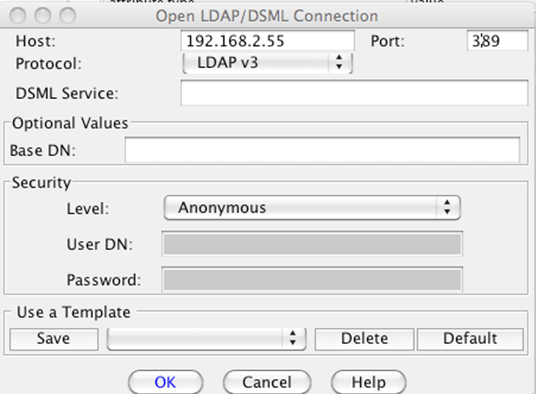 Click OK and expand the root objects to determine the base DN. Also, select Table Editor view to see the actual object type. In this example, the base is o=lab.
- Server Enter the IP address of the eDirectory server to be monitored and click Add. To monitor multiple servers, click the Copy Setting option to configure the settings at the bottom of the screen for each server. You may need to enter information for multiple eDirectory servers. If the directory is partitioned among servers, make sure each partition has a server configured. Also, depending on how quickly information is synchronized between servers, you may want to add additional servers to ensure that user/ip mappings show up more quickly.
- Search Base is the base DN (or root) of the directory where the agent looks for users. In a large deployment, you can scope how much of the directory is searched by setting the search base appropriately. In eDirectory, this is typically in the form of o=. Using JXplorer, you can connect to eDirectory anonymously and specify only the IP address and the default non-SSL port, as shown below.
- Bind Distinguished Name and Password is the fully distinguished name (FQDN) of the user you will use to query eDirectory. This account does not need any special privileges.E nter the password for this account. You should be able to browse to this anonymously as we did to get the BaseDN. Remember that the fully distinguished name is built from using the entire hierarchy. In our example, that would be cn=Admin, o=lab.
- Server Domain Prefix (optional) is pre-pended to the user name and can be useful if you are using multiple authentication sources. In our example, users show up in the traffic logs as: mynds\username.
- Search Interval The default of 30 seconds should be fine but this can be adjusted. After the first query to build the list of all currently logged in users, subsequent queries search only for user entries modified since the last query.No other fields need to be modified as they are set to specifically work with eDirectory. Keep the bind port at 636, with SSL enabled, as eDirectory does not allow authenticated LDAP queries to be sent in the clear.
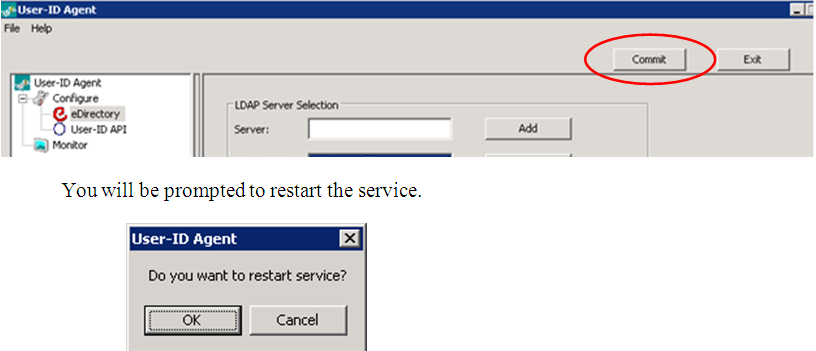
- After entering the required information, click Commit to save the changes.
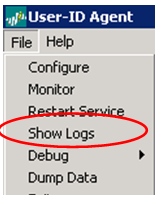
- View the agent logs to see what is happening with the agent. Go to File > Show Logs to open a .txt file.Note: If agent logs need to be modified, use an LDAP browser to determine what to set the fields to:
 Scroll to the bottom of the text file to view the latest debug output from the agent. Examine the output under the header labeled "Service is being started." Shown below is an example of the log file:
 See the message "connect succeeds on server x.x.x.x," as highlighted above. If you do not see that message, you'll need to troubleshoot.
Helpful Troubleshooting Tips
- Error 81 in the log, make sure that the bind port/SSL setting is configured as needed.
- Error 93 in the log may indicate a communication error. You may be running the wrong version of eDirectory, or the base DN is not correct.
- To increase the amount of information logged, go to the File > Debug menu to set the level to be more detailed (default level is info), then restart the service (File > Restart Service).
Note: This text file is not updated dynamically, so you have to close it, then use the menu to view new information.
To verify the configuration, select the Monitor icon to view user-to-IP mappings. The number of mappings increases as the agent reads more information from the LDAP server.
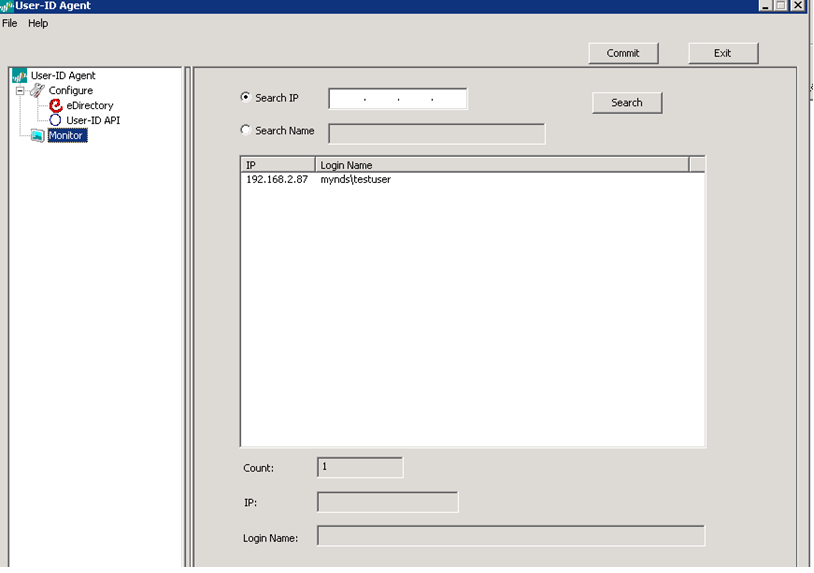
When you see a list of users on this screen, you've configured the agent properly. Now move on to configuring the firewall to talk to this agent.
Configuring the Firewall to Talk to the User-ID Agent
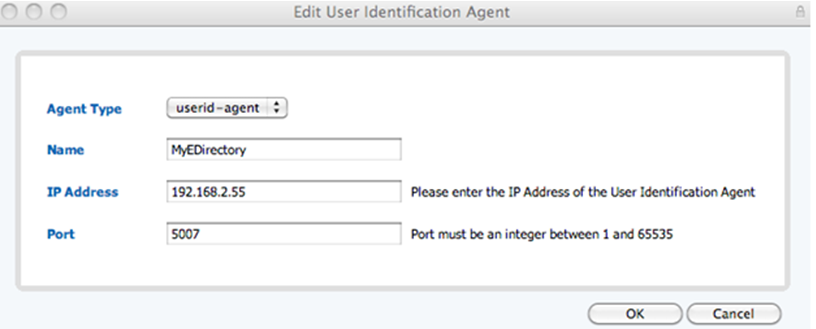
- From the Web UI, select Device, then select User Identification from the list on the left. Under the User Identification Agent section, click Add. Set the Agent Type as user-id-agent, name it, and fill in the IP address and port you configured the agent to listen on (default port is 5007).
- Enable User Identification on the appropriate zone. Choose Network, select Zones from the list on the left, then select the zone where user traffic originates. At the bottom of the screen, check Enable User Identification.

- Commit changes.
- To confirm that the firewall is communicating with the agent, run the following command:
> show user userid-agent statistics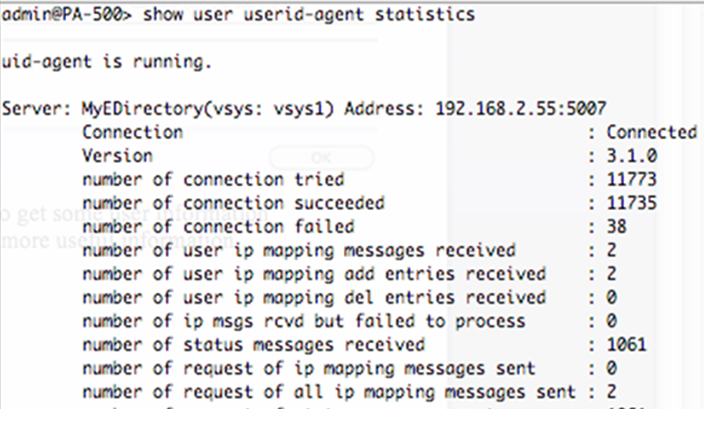
- To confirm that the user database was obtained from the agent, run the following command:
> show user ip-user-mapping
The User-IDs display under the Monitor > Traffic log in the source-user and target-user columns.
Now that the basic User-ID is working, create an LDAP Server Profile to use later for the User Identification LDAP server setup.
- From Device, under Server Profiles, select LDAP, then click New.
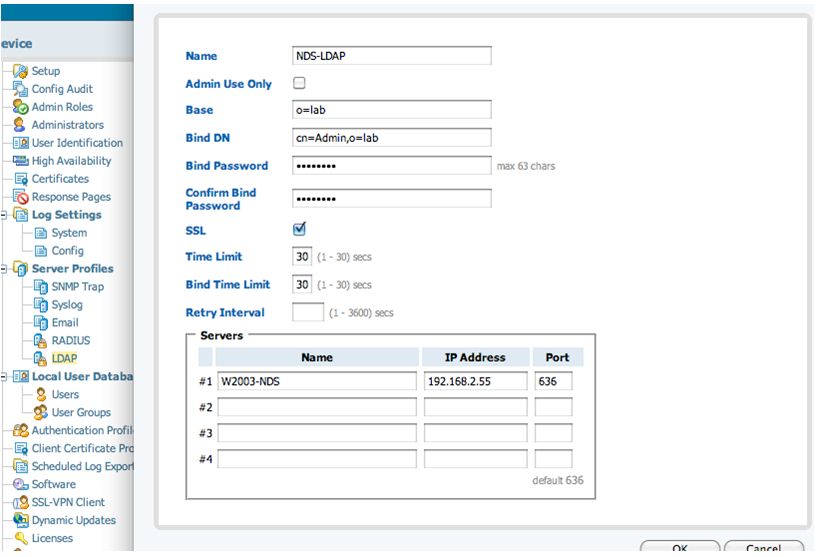
- Fill in the same information you used when setting up the User Agent. Make sure SSL is enabled and the port is set to 636. eDirectory does not allow passwords to be sent in the clear.
Define the LDAP Server to Retrieve Group Information
For the final step, define the LDAP server to retrieve the group information.
- Under Device, select the User Identification icon. Choose Add, give the server a name, and select the Server Profile just created.
- Create a group or user profile, if desired. A user profile limits the users and groups that the firewall learns about for use in the policy. For eDirectory, we do not need to complete any other fields.The firewall will be retrieving object class cn=group.
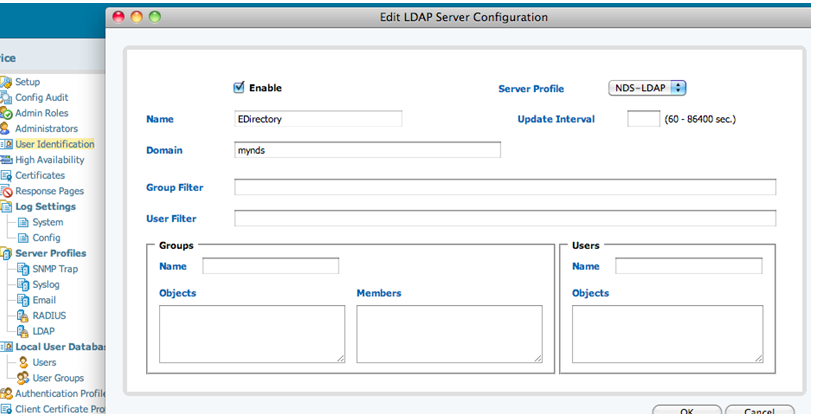
- Commit the changes. The group information is now being retrieved from the directory. It may take a while to populate the group and user information.
- To confirm that the firewall is communicating with the LDAP server, and that group information was retrieved:
> show user ldap-server server EDirectory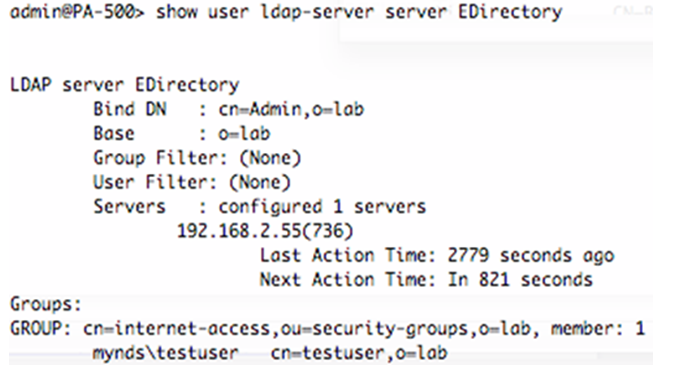
Once the group and user information is retrieved, then that information can be used in policy.
To confirm, go to the Policies tab, click in the source-user column, and in the screen that appears, groups should appear.
To confirm, go to the Policies tab, click in the source-user column, and in the screen that appears, groups should appear.
Using the LDAP Server for Authentication with Captive Portal, SSL VPN, or Firewall GUI Access
For situations where we need to actually challenge users for a username and password, we can now use LDAP. There are three basic steps involved:
- Add an LDAP server under Server Profiles
- Add an LDAP server under the User Identification section
- Create an Authentication profile using the defined LDAP server
In the following example, we will connect to Active Directory using LDAP.
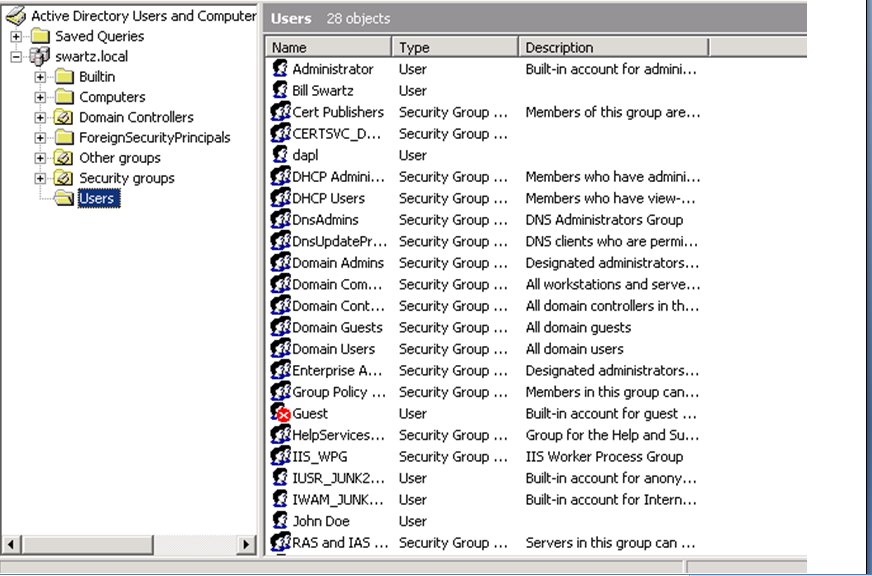
- Under Device, select the LDAP option under Server Profiles. Click New to add the server. As in our previous example, fill in all the necessary information.Unfortunately we cannot find the Base using the method we did for eDirectory. However if you go into Active Directory’s Users and Computers you can see the base of the directory. In the example below, the base would be dc=swartz,dc=local
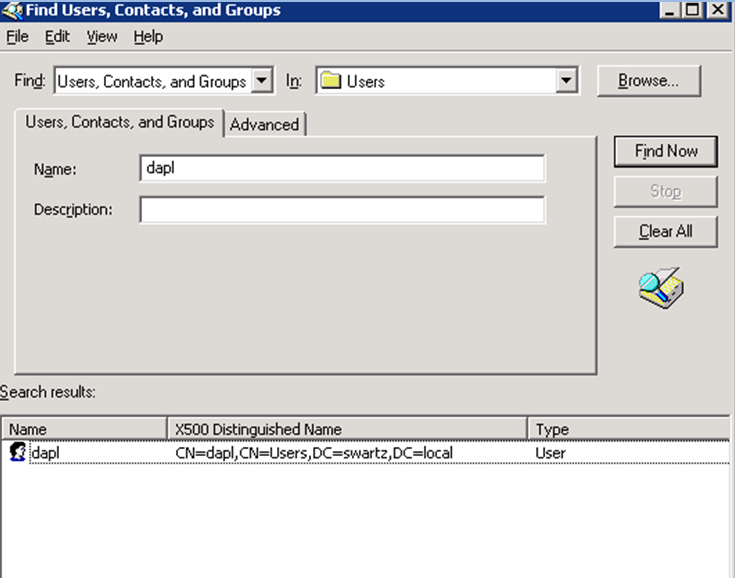
 To find Bind DN, search for the user while still in Users and Computers, then get results from the View menu. Select Choose Columns. Add the X500 distinguished name. The results should look like:
 With this information, we can now finish the configuration.
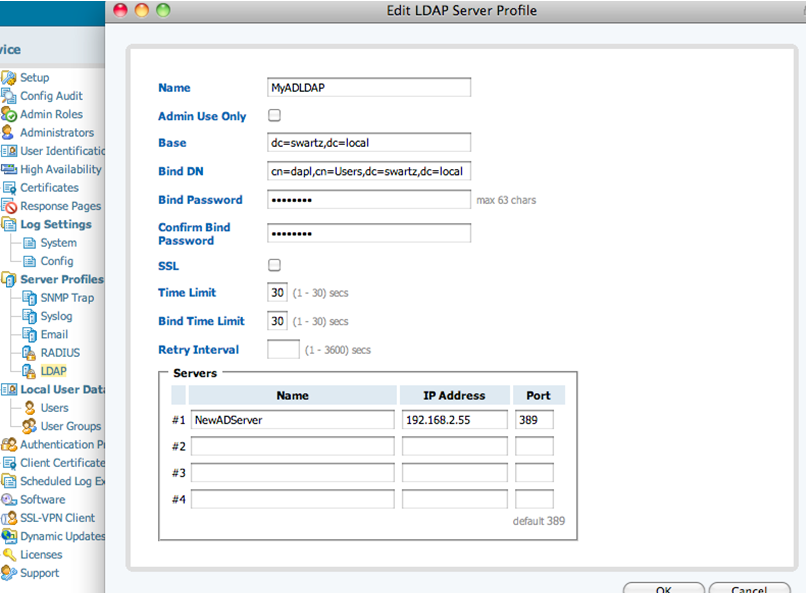 Note: In this example, we are setting it up without SSL encryption over port 389. The Active Directory does not require encryption and is not available by default. To enable SSL for LDAP in Active Directory, the following URL can prove helpful: http://www.linuxmail.info/enable-ldap-ssl-active-directory/.
 - Add the LDAP server in the User Identification section. There are a few differences. For Active Directory, specify how to determine group and user objects. For Active Directory, you can set the fields as follows:sAMAccountName corresponds to a user login name in Active Directory.
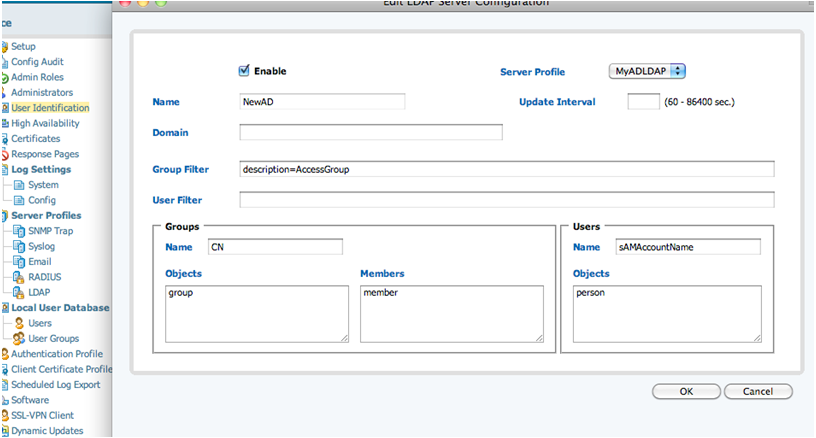 Notice the group filter: description=AccessGroup. This limits the number of groups and users that the firewall learns about and are available for use in creating policies.In the following example, the description fields on the groups are set. Shown below is a before and after look at the effect of this setting in this scenario--changes were committed before and after adding this setting.
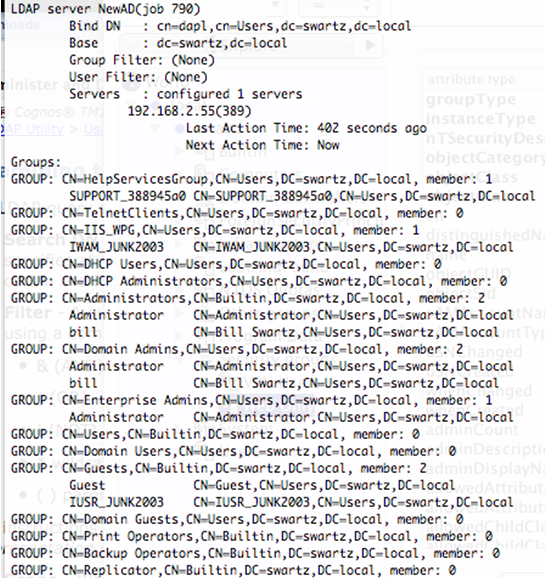
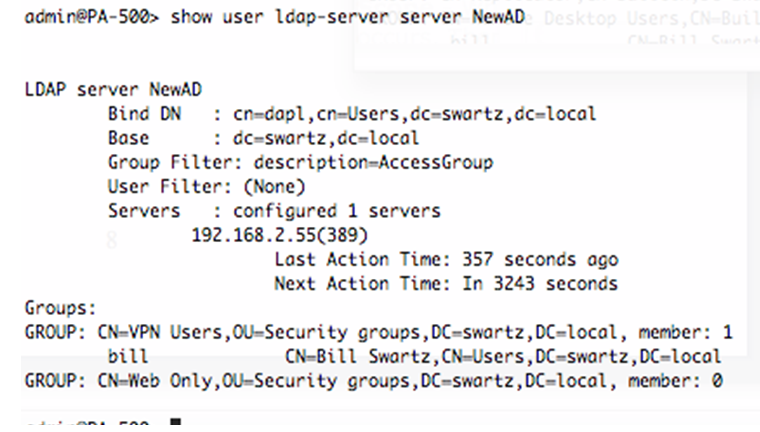 The User filter can restrict users that you will learn about. These filters control only the groups you see or users you can search for when setting an Allow List in an Authentication Profile or when setting a source user or group in policy.Note: Domain Users is a special group in Active Directory that users are tied to it as part of the user schema with the attribute primaryGoupID. Members cannot be enumerated through an LDAP query, as the member attribute is not set for this group, so it cannot be used to learn all of the usernames.To learn more about building LDAP queries, refer to the following sites:
- Groups: Name=CN, Objects:=group, Members=member
- Users: Name=sAMAccountName, Objects=person
- The final step is to create an Authentication Profile using the LDAP server. From Device, select the Authentication Profile icon and choose New. Give the profile a name, set Authentication to LDAP, select the Server Profile created, and set the login attribute. This maps the name entered by the user to an LDAP attribute. For AD, use sAMAccountName.
- Edit the Allow List to specify the groups and users that can use this method of authentication.
Note: Specify each user that will be assigned administrative access: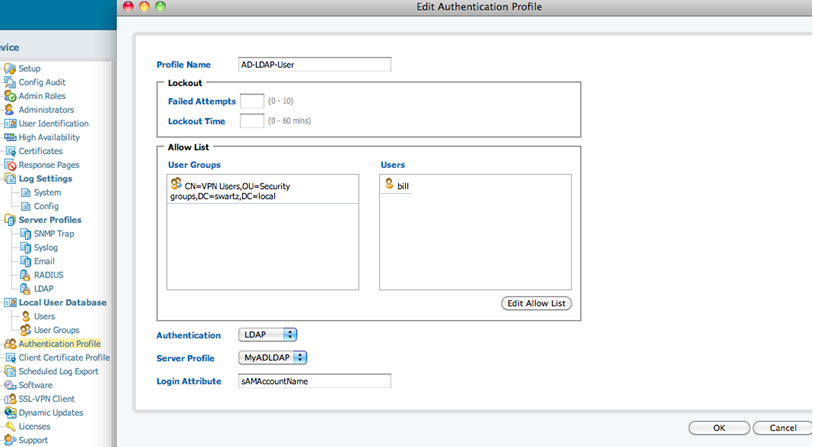 This profile is now ready for administrative access, Captive Portal, or SSL VPN access as previously set for RADIUS or a Local User Database.Shown below is a screenshot of an SSL VPN profile using LDAP:
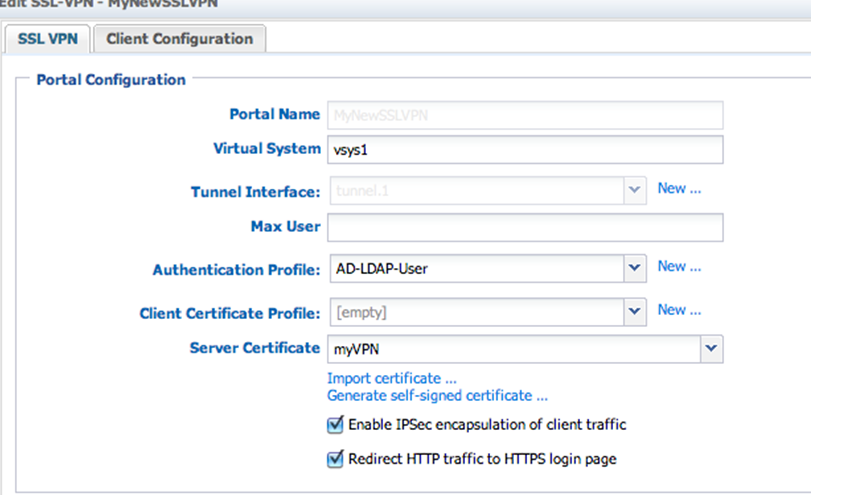
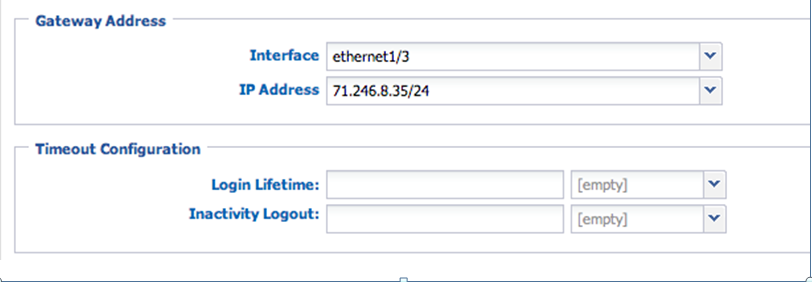 One advantage of using LDAP for authentication is that for most organizations already have a directory service that supports LDAP, so nothing needs to be installed or configured. Since we allow the user to define how to determine both groups and users, it should work with almost any LDAP compatible directory.
More Information
Overview of the Lightweight Directory Access Protocol
Lightweight Directory Access Protocol (LDAP) is an open standard for providing directory services through IP networks. LDAP is based upon X.500, the OSI Directory Access Protocol, and was first described in RFC1487. The most recent version (version 3) is described in RFC2251.
There are two main components to an LDAP database that we must understand in order to use it for authentication, its structure and its contents.
LDAP is a hierarchical database structure that lends itself to defining organizations and their structures. It is incredibly flexible is design, because of this each organization’s LDAP structure will differ.
The contents of the directory are defined in its schema, which is highly extensible. Users can modify the database design to meet their needs. The directory schema defines the possible database objects and attributes they can possess. When viewing a directory, it is common to view it as a collection of container objects (organizations, organizational units) and leaf objects (people, computers).
RFC 2377 defines the basic schema for directory-enabled applications. Following is a list of some of the ones that are important to us:
- rdn: Relative distinguished name is the name of an object without reference to its place within the tree. It is often based upon the object’s common name.
- dn: Distinguished Name is the name that defines an object by indicating its location within the directory hierarchy. It is created by concatenating the relative distinguished names of the object and each of its ancestors up to the root of the directory partition. This name is unique across the entire directory
- base DN: Each directory is required to provide basic directory specific information so that clients can access them. One of these attributes is the list of base distinguished names (DN) that you can access on this server. Typically the base DN will be the various domain components of the directory.
- cn: Common Name is typically used to reference objects, as it is an attribute that all leaf objects possess.The common name need only be unique within its own container (so it is possible to have two objects with the cn of Bob as long as they are in separate containers. This attribute can contain the users login name.
- oOrganization is many times the root of a directory. Below the organization will be the various organizational units, groups, and members. eDirectory uses this as the base of its structure.
- ou: Organizational Unit is used to help define the structure of the organization. A directory can be comprised of multiple organizational units on any level of the tree.
- dc: Domain Component defines the top level portions of the directory and is based upon the organization’s DNS domain name. Active Directory uses this format.
- member: Attribute of a group object that contains all of the members of a group. The firewall uses this attribute to determine if a user is in a static group.
LDAP Browsers
- Softerra LDAP Administrator is an excellent LDAP tool for Windows, which can be found at: >http://www.ldapadministrator.com/>.
Note: After initial free trial, purchasing this application for further use will be required. - JXplorer is a free Java based browser that works on Windows, Mac and Linux. It can be found at: http://jxplorer.org/.
- LdapBrowser by IIT Engineering is another free java based browser that can be found here: http://www.brothersoft.com/ldap-browser-14779.html
No comments:
Post a Comment