How to Implement and Test SSL Decryption
Overview
PAN-OS can decrypt and inspect inbound and outbound SSL connections going through the Palo Alto Networks firewall. SSL decryption can occur on interfaces in virtual wire, Layer 2 or Layer 3 mode by using the SSL rulebase to configure which traffic to decrypt. In particular, decryption can be based upon URL categories and source user and source/target addresses. Once traffic is decrypted, tunneled applications can be detected and controlled, and the decrypted data can be inspected for threats, URL filtering, file blocking, or data filtering. Decrypted traffic is never sent off the device.
Inbound SSL Decryption
In the case of inbound traffic to an internal Web Server or device, the administrator imports a copy of the protected server’s certificate and key. When the SSL server certificate is loaded on the firewall, and a SSL decryption policy is configured for the inbound traffic, the device then decrypts and reads the traffic as it forwards it. No changes are made to the packet data, and the secure channel is from the client system to the internal server. The firewall can then detect malicious content and control applications running over this secure channel.
Outbound SSL Decryption (SSL Forward Proxy)
In this case, the firewall proxies outbound SSL connections by intercepting outbound SSL requests and generating a certificate on the fly for the site the user wants to visit. The validity date on the PA-generated certificate is taken from the validity date on the real server certificate.
The issuing authority of the PA-generated certificate is the Palo Alto Networks device. If the firewall’s certificate is not part of an existing hierarchy, or is not added to a client’s browser cache, then the client receives a warning when browsing to a secure site. If the real server certificate has been issued by an authority not trusted by the Palo Alto Networks firewall, then the decryption certificate is using a second “untrusted” Certificate Authority (CA) key to ensure the user is warned of any subsequent man-in-the-middle attacks.
To configure SSL decryption:
- Configure the firewall to handle traffic and place it in the network.
- Make sure the proper Certificate Authority (CA) is on the firewall.
- Configure SSL decryption rules.
- Enable SSL decryption notification page (optional).
- Commit changes and test decryption.
Steps
1. Configure the firewall to handle traffic and place it in the network
Make sure the Palo Alto Networks firewall is already configured with working Interfaces (Virtual Wire, Layer 2 or Layer 3), Zones, Security Policy and already passing traffic.
2. Load or Generate a CA certificate on the Palo Alto Networks firewall
A Certificate Authority (CA) is required to decrypt traffic properly by generating SSL certificates on the fly. Create a self-signed CA on the firewall or import a Subordinate CA (from your own PKI infrastructure). Select "Forward Trust Certificate" and "Forward Untrust Certificate" on one or more certificates to enable the firewall to decrypt traffic.
Note: Because SSL Certificate providers like Entrust, Verisign, Digicert, and GoDaddy do not sell CAs, they are not supported in SSL Decryption.
From the firewall GUI, go to Device > Certificates. Load or generate a certificate for either inbound inspection or outbound (forward proxy) inspection.
Generating a Self-Signed Certificate
Using a Self-Signed Certificate is recommended. For information on generating a Self-Signed Certificate, please see:
How to Generate a New Self-Signed SSL Certificate SEE BELOW
 Generate a SelfSigned Certificate
 Certificate successfully generated
 Enable Forward Trust and Untrust
Steps
1. From the WebGUI, navigate to Device > Certificates.
2. Click Generate at the bottom of the screen.
3. Enter the desired details for the certificate. The details entered here are what users see if they view the CA certificate for an encrypted session using the browser.
Note: If you would like the certificate to be valid for longer than 365 days (1 year), then please change the "Expiration (days) from 365 to a larger value before creating the certificate.
Note: If you would like the certificate to be valid for longer than 365 days (1 year), then please change the "Expiration (days) from 365 to a larger value before creating the certificate.
Generate a SelfSigned Certificate
4. On the Generate Certificate window, click Generate:
Certificate successfully generated
5. To verify that the certificate was created properly, click on the newly generated certificate.
Note: If using this certificate for SSL Decryption, please check "Forward Trust Certificate" and "Forward Untrust Certificate". To delete or remove the certificate, uncheck both options, otherwise an error is generated.
Enable Forward Trust and Untrust
6. Commit the changes. When the commit operation completes, the Self-Signed CA certificate isinstalled.
CLI
From the CLI, to create a new self-signed certificate, run the following command, <all on one line>(PAN-OS 6.1 only)
> request certificate self-signed country-code US email support@paloaltonetworks.com locality Alviso state CA organization “Palo Alto Networks” organization-unit “Session inspected by policy” nbits 1024 name “SSL Inspection” passphrase bubba for-use-by ssl-decryption
For PAN-OS 7.0 and after, a very simple self signed certificate can be created with this command:
> request certificate generate name "Firewall-a" certificate-name "ssl test"
You can always use the <tab> or "?" when in the CLI to see what the next commands can be.
Generating and Importing a Certificate from Microsoft Certificate Server
- On the Microsoft Certificate Server for your organization, request an advanced certificate using certificate template “subordinate CA”. Download the cert.
- After downloading, export the certificate from the local certificate store. In IE, access the Internet Options dialog, select the Content tab, then click the Certificates button. The new certificate can be exported from the Personal certificates store. Select “Certificate Export Wizard”, export the private key, then select the format. Enter a passphrase and a file name and location for the resulting file. The certificate will be in a PFX format (PKCS #12).
- To extract the certificate, use this openSSL[4] command:
openssl pkcs12 –in pfxfilename.pfx –out cert.pem –nokeys - To extract the key, use this openSSL command:
openssl pkcs12 –in pfxfilename.pfx –out keyfile.pem -nocerts - Import the cert.pem file and keyfile.pem file into the Palo Alto Networks firewall on the Device tab > Certificates screen.
- In the case of a High Availability (HA) Pair, also load these files into the second Palo Alto Networks firewall, or copy the certificate and key via the High Availability widget on the dashboard.
The "Forward Trust" and "Forward Untrust" certificates:

Note: If using a self-signed CA, export the public CA Certificate from the firewall and install the certificate as a Trusted Root CA on each machine's browser to avoid Untrusted Certificate error messages inside your browser. Network administrators usually use GPO to push out this certificate to each workstation.
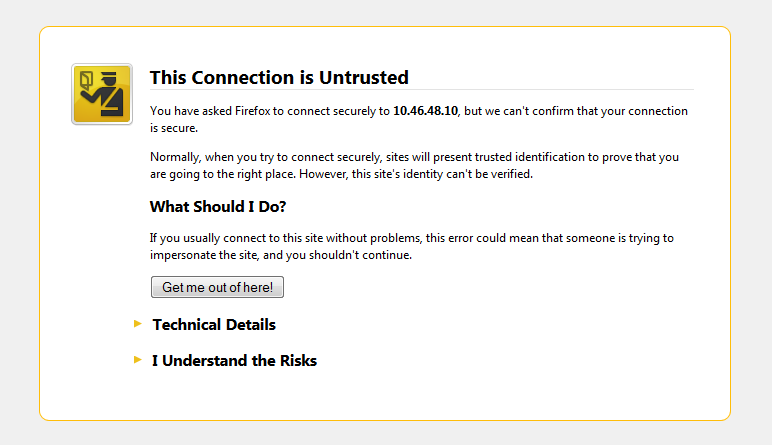
Examples of browser errors if the self-signed CA Certificate is not trusted:
Firefox untrusted CA error:
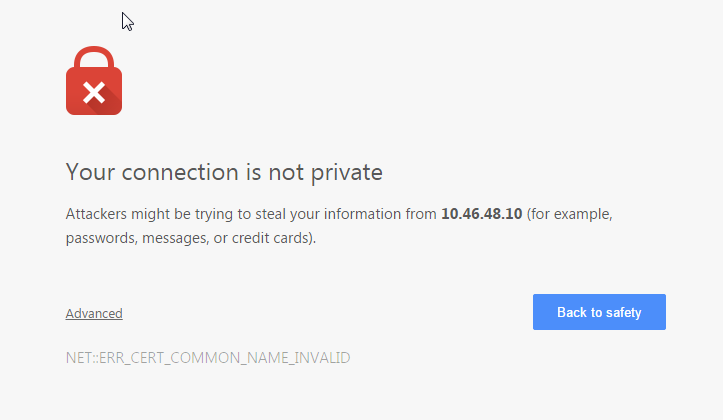
Chrome untrusted CA error:
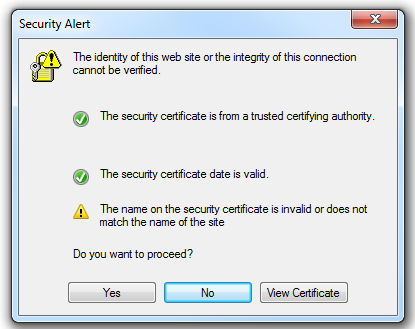
Internet Explorer untrusted CA error:
3. Configure SSL Decryption Rules
The network administrator determines what needs to be decrypted. A few suggestions for configuring SSL decryption rules:
- Implement rules in a phased approach. Start with specific rules for decryption, and monitor the typical number of SSL connections being decrypted by the device.
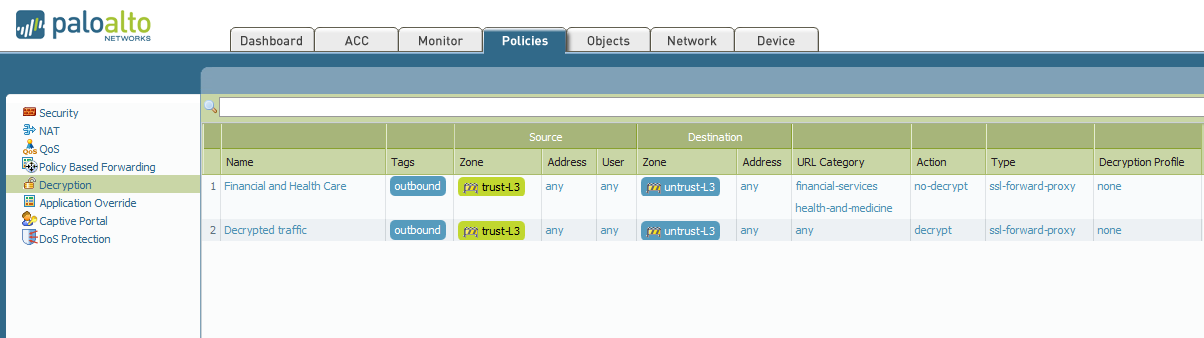
- Avoid decrypting the following URL categories, as users may consider this an invasion of privacy:
- Financial services
- Health and medicine
- Do not decrypt applications where the server requires client-side certificates (for identification).
- You can either block or allow connections requiring client authentication via the decryption profile feature introduced in PAN-OS 5.0.
An example of an outbound rulebase following suggestions for decryption.
4. Enable SSL Decryption Notification web page (optional)
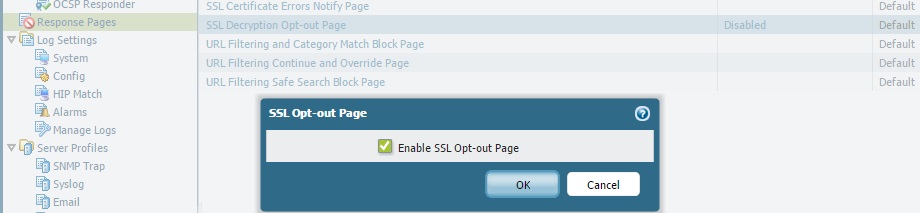
- The user can be notified that their SSL connection will be decrypted using the response page found on the Device tab > Response Pages screen. Click "Disabled," check the "Enable SSL Opt-out Page" option and click OK.
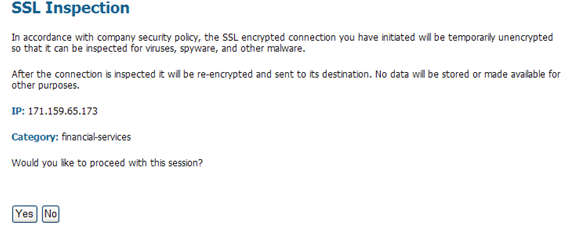
The default SSL Opt-out page page can be exported, edited via an html editor, and imported to provide company-specific information:
5. Test Outbound Decryption
To test outbound decryption:
- Make sure that in the outbound policy, the action is to alert for any viruses found. Also enable packet capture on that anti-virus security profile. Commit any changes made.
- On a PC internal to the firewall, go to www.eicar.org. In the top right corner:

- Click “Download anti-malware testfile."
- In the screen that appears, scroll to the bottom.
- Download the eicar test virus using http. Any of the these four files will be detected.

- Go to the Monitor tab > Threat log, and look for the log message that detects the eicar file.

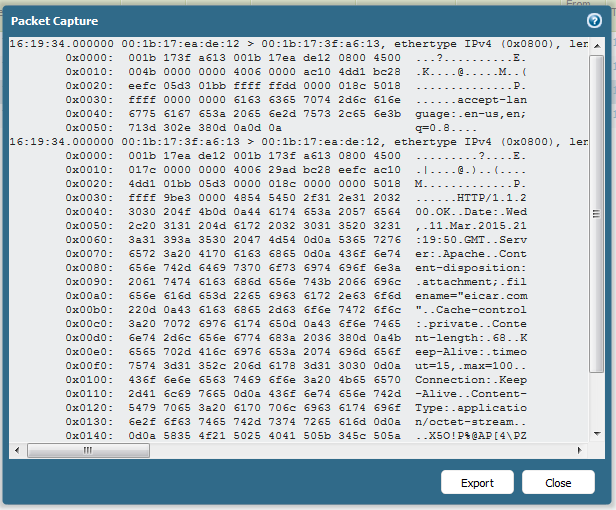
- Click the green arrow in the column on the left to view the captured packets.

- Click the magnifying class in the far left column to see the log detail.

- Scroll to the bottom, and look for the field “Decrypted.” The session was not decrypted:

- Go back to the www.eicar.org downloads page. This time use SSL enabled protocol HTTPS to download the test virus.

- Examine the Threat logs. The virus should have been detected, since the SSL connection was decrypted. A log message that shows Eicar was detected in web browsing on port 443 will be visible.

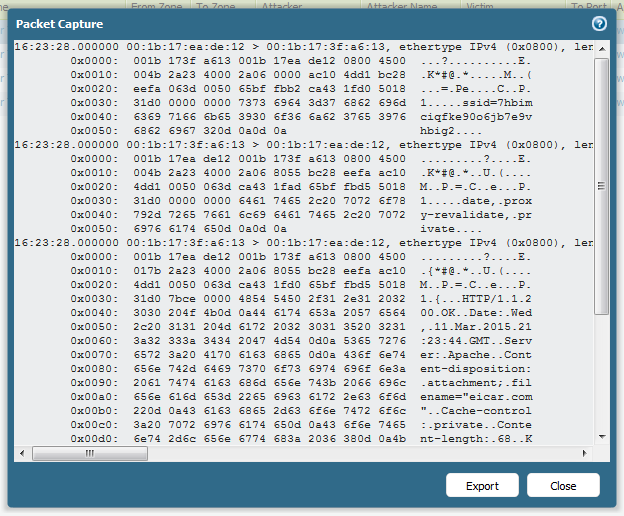
- View the packet capture (optional) by clicking the green arrow.
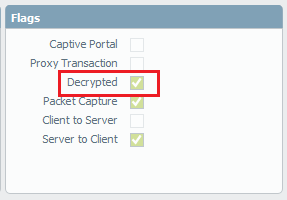
- To the left of that log entry, click the magnifying class. Scroll to the bottom. Under Flags, check to see that “Decrypted” is checked:

The virus was successfully detected in an SSL-encrypted session.
To test the “no-decrypt” rule, first determine what URLs fall into financial services, shopping, or health and medicine categories. For BrightCloud, go to http://www.brightcloud.com/testasite.aspx. For PAN-DB, use Palo Alto Networks URL Filtering - Test A Site , and enter a URL to see what the category is.
Once web sites that are classified into categories that will not be decrypted are found, use a browser to go to those sites using https. There should be no certificate error when going to those sites. The web pages will be displayed properly. Traffic logs will show the sessions where application SSL traverses port 443, as expected.
To Test Inbound Decryption:
- Examine the traffic logs dated before enabling SSL for inbound decryption on the firewall. Look at traffic targeted for the internal servers. In those logs, the application detected should be “ssl" going over port 443.
- From a machine outside of the network, connect via SSL to a server in the DMZ. There will be no certificate errors, as the connection is not being proxied, just inspected.
- Examine the logs for this inbound connection. The applications will not be “ssl" but the actual applications found inside the SSL tunnel. Click the magnifying glass icon in those log entries to confirm decrypted connections.
Helpful CLI Commands:
To see how many existing SSL decryption sessions are going through the device:
> debug dataplane pool statistics | match proxy
Output from a PA-2050, where the first command shows 1024 available sessions, and the output of the second command shows five SSL sessions being decrypted (1024–1019=5):
admin@test> debug dataplane pool statistics | match proxy
[18] proxy session : 1019/1024 0x7f00723f1ee0
To see the active sessions that have been decrypted:
> show session all filter ssl-decrypt yes state active
Maximum number of concurrent SSL decrypted sessions in PAN-OS 4.1, 5.0, 6.0 and 6.1 (both directions combined):
| Hardware |
|---|
No comments:
Post a Comment