Getting Started: Setting Up Your Firewall
I've unpacked my firewall, now what?
After unboxing your brand new Palo Alto Networks firewall, or after a factory reset, the device is in a blank state with nothing but the minimum configuration and a software image that's installed in the factory. Where do you go from here? Our first installment in the new Getting Started series guides you through the very first stages of preparing your firewall for operation.
We'll be taking a look at how to connect to the firewall for the first time, how to set up licenses so you can download new software and content, and how to prepare your first security policy.
The first thing you'll want to configure is the management IP address, which makes it easier to continue setting up your new device later on.
1. Initial setup
The two methods available to connect to the new device is either using a network cable on the management port or an ethernet-to-db-9 console cable.

When using the management port, the workstation you'll be using must be reconfigured so its network interface has an IP address in the 192.168.1.0/24 IP range, as the default IP of the management port will be 192.168.1.1.

When using a console cable, set the terminal emulator to 9600baud, 8 data bits, 1 stop bit, parity none, VT100. If you use PuTTY, it should come with the appropriate configuration if connection type is set to Serial.
After preparing the cables and the workstation, plug the unit into an electrical outlet and watch the firewall boot up.
The console outputs the boot sequence:
                Welcome to PanOS
Starting udev: [  OK  ]
Setting clock  (utc): Wed Oct 14 11:10:53 PDT 2015 [  OK  ]
Setting hostname 200:  [  OK  ]
Checking filesystems:
   Running filesystem check on sysroot0: [  OK  ]
   Running filesystem check on pancfg: [  OK  ]
   Running filesystem check on panrepo: [  OK  ]
[  OK  ]
Remounting root filesystem in read-write mode:  [  OK  ]
Enabling /etc/fstab swaps:  [  OK  ]
INIT: Entering runlevel: 3
Entering non-interactive startup
Starting Networking: [  OK  ]
Starting system logger: [  OK  ]
Starting kernel logger: [  OK  ]
....
After the device is booted, a login prompt is displayed in the console connection and SSH or SSL connections can be made to 192.168.1.1.
We'll highlight the console and SSH in step 1.1. and the Graphical User Interface or GUI in step 1.2.
1.1. Console and SSH connection

The default username and password are admin / admin, so we'll go ahead and log in to reveal the CLI. From here, we'll start setting up the proper IP address and subnet for the device, and the default gateway and DNS settings, so the unit can collect updates later.
login as: admin
Using keyboard-interactive authentication.
Password:
Last login: Wed Oct 14 11:57:16 2015 from 192.168.1.168
Warning: Your device is still configured with the default admin account credentials. Please change your password prior to deployment.
admin@PA-200> configure
Entering configuration mode
[edit]
admin@PA-200# set deviceconfig system ip-address 10.0.0.10 netmask 255.255.255.0 default-gateway 10.0.0.1 dns-setting servers primary 4.2.2.2
Use the commit command to apply the new settings to the system.
admin@PA-200# commit


..................55%...60%75%.99%...........100%
Configuration committed successfully

[edit]
At this point, you'll lose SSH and SSL access to the device, as the IP address was changed and the management service restarted to adopt these changes. Now you need to reconnect to the new IP address—please skip to step 1.3.
1.2. Web interface initial setup
When making your first connection to the web interface, your browser may display an error message. This is because the certificate used by the web interface is a self-signed certificate your browser does not trust. You can safely ignore the error message at this time, which then takes you to the login screen:


Log in, using the default username and password admin / admin, then navigate to the Device tab. Select Setup on the left pane, then select Management, where you can change the Management Interface Settings:

Change the interface configuration and click OK.

Next, select the Services tab and configure a DNS server.


To complete this step and apply changes to the device, click the Commit link at the top right:


After the commit completes, the browser eventually times out as the IP address has changed, so you'll need to manually change the address in the address bar to reconnect to the new IP.
1.3 Finishing up the first step
The firewall is now configured with a proper IP address to work in your LAN network, so go ahead and connect the cables:
- Connect Interface 1 to the router
- Connect Interface 2 to the switch
- Connect the Managment (mgmt) interface to the switch
You should be able to connect to the management IP from the network, and you should be able to surf out to the Internet.

2. Preparing the licenses and updating the system
To be allowed to download content and application updates or software upgrades, the system needs to be licensed. Various licenses control the different functions of the system, so the—
- Support license entitles the system to software and AppID updates
- ThreatPrevention license adds virus, threats and malware signatures
- URL license enables URL categories for use in security policies
If the device has not been registered on the support portal yet, please follow these steps to register the device: How to Register a Palo Alto Networks Device, Spare, Traps, or VM-Series Auth-Code
Navigate to the Device tab and select Licenses from the left pane:
If the device has been registered using the above method and auth codes have already been added, go ahead and select Retrieve License keys from license server.
If the device was registered but no licenses added yet, select Activate feature using authorization code to activate a license through its authorization code, which you will have received from your Palo Alto sales contact.

After the licenses have been succesfully added, the Licenses page looks similar to this:
Now you're ready to start updating the content on this device, so navigate to the Device tab, then select Dynamic Updates from the left pane.
The first time this page opens, there will be no visible packages for download. The system will first need to fetch a list of available updates before it can display which ones are available, so select Check Now.

When the system retrieves a list of available updates, the Applications and Threats package becomes available. You may notice the AntiVirus package is missing—it appears only after downloading and installing the Applications and Threats Package.


After the package is downloaded, go ahead and install it to the system.


When the Applications and Threats package has been installed, run another Check Now to retrieve the Antivirus package. 

Now download and install the Antivirus package just like you did with the Applications and Threats package.
With these tasks completed, this is a good time to set a schedule for every package to be automatically downloaded and installed at a time that's convenient for you. Content updates can be installed during production and don't interrupt existing sessions, so it's safe to apply updates during the day. However, most organizations opt to perform updates during the night or off-hours to minimize risk.
Set a schedule by clicking the timeframe next to the schedule:

After setting the appropriate schedules, commit the change.
note: the treshold setting is an amount of hours to hold before a commit is pushed and the package is installed. At the time the hold expires another check is performed to verify the package is still available or has been updated with a newer one. If the same package is still available on the update server, it is installed. If a newer package is available, it is downloaded and the Treshold timer is reset.
After the commit completes, go ahead and upgrade the system to a more recent PAN-OS in case the unit is installed on an older OS.
In the Device tab, open the Software section. The first time you access this tab, a popup displays No update information available, because the system has no previous contact with the update server and doesn't know which updates are available. Go ahead and close this popup, then select Check Now.

The next part may vary depending on which version is currently active on your device. If your firewall is already running 7.1.0 or higher, you may only need to install the latest maintenance release. If your firewall is currently on 6.1.x , you'll download both PAN-OS 7.0.1 and the latest 7.0.x. To allow for smaller cumulative updates, the first image in a major code train is used as a base image. Any subsequent updates, or maintenance releases, are smaller and contain mostly updates.
Install 7.0.2 in this instance, but go ahead and select a newer version if one is available., once the installation is completed, repeat the steps to go up to the next major version until the desired release is reached.

When you click Install, a warning may display. Click OK on the message and continue with the installation.

After the installation completes, reboot the firewall to activate the new PAN-OS.

In the event the device comes installed with a version older than the major version directly preceding the currently available latest major release, so in this example if the firewall was pre-installed in PAN-OS 6.0, we would first need to install the next major version, 6.1, before being able to upgrade to 7.0 and so on.
3. Preparing security profiles
The system comes preloaded with a default security profile in each category.


For now, you'll start the configuration with these default profiles, except for URL filtering.
Once you feel ready to 'kick it up a notch' please check out this tutorial : Optimizing Your Security Policy
Navigate to the Objects Tab, select Security Profiles > URL Filtering and add a new URL filtering profile.

In this first custom URL filtering profile, start by setting all actions to alert rather than allow, as the allow action doesn't create a URL filtering log entry. Set actions to alert to gain some insight into the kind of web browsing happening on the network.

All other default profiles should already provide sufficient coverage for network security and for offensive sessions to become visible in the appropriate logs. Next up, you'll prepare the group of unwanted applications.
4. Applications
After downloading update packages, the firewall contains a lot of applications you can use to create security policy, but these applications also come loaded with useful metadata to create groups of applications based on their behavior, called an application filter. Rather than having to manually add applications to a group and keep the list current, the application filter automatically adds new applications that match a certain behavior to the application filter, enabling the security policy to take appropriate action.
Create an application filter with undesirable behavior for the first policy. Go to the Objects tab, then select Application Filters.

As an example, you'll create an application filter called peer-to-peer, where you add all applications that match Subcategory file-sharingand Technology peer-to-peer.

Now you're ready to set up your first security policy and look at the logs, but first, let's take a quick detour to look at the network configuration.
5. Network configuration
If you navigate to the Network tab and look at Interfaces, you see that interfaces 1 and 2 are both set up as Virtual Wire, or vwire, and are both added to the default-vwire.

A vwire has some interesting advantages over other types of interface configurations: it is considered a bump-in-the-wire, which requires no IP address on the interface and no routing configuration. It can simply be plugged in between your router and switch to start passing traffic. We'll cover other interface types in upcoming articles, but for now, let's stick with the vwire configuration.
If the interfaces are red, they are not connected to an active device, make sure ethernet1/1 is connected to your outbound router and ethernet1/2 is connected to your internal switch and both interfaces are green.
6. Security policy and logging
Now that you've prepared your device, let's look at the security policies and set up an initial configuration that allows good traffic to go out and bad traffic to be blocked.
The initial security policy simply allows all outbound traffic, without inspection. There are two default rules that allow intrazone and block interzone traffic. We'll zoom in on these last two in an upcoming session as they are not currently relevant to the vwire.

Start by editing rule1 and make it the 'bad applications' block rule:

Leave the source and destination as they are.
Under Application > Application Filter, select peer-to-peer. It helps to type the name of the application or group you want to add—no need to scroll through all the applications:

Under Actions, set the action to Deny as you don't like peer-to-peer, and click ok.

Next you'll create a security policy to allow everything else out. We recommend you add applications to the 'allow' rule later, but for now, let's block only the applications we know we don't like and allow the rest, so you can gain visibility into what kind of traffic is passing onto the Internet and decide if you want to block more applications down the line.


Under Source, select trust as the source zone associated with Interface 2, which is connected to the LAN switch.

Under Destination, select untrust as the zone associated with Interface 1 and connected to the Internet router.

Leave the appliactions as Any for now.

Under Actions, you'll add security profiles to enable scanning of outgoing connections for malicious content or to apply URL filtering to browsing sessions.


The security policy should now look like this. Make sure the Internet-access policy is positioned below the bad-applications-block policy, as the security policy is processed top to bottom for every new connection, and the first positive match applies. If the bad-applications-block policy is located below the Internet-access rule, peer-to-peer applications will be allowed.

Now go ahead and commit these changes and navigate to the Monitor tab. When the commit operation completes, the logs start filling up with interesting traffic log, URL logs, and threat logs, if any infections are detected.

I hope you enjoyed this article. Please feel free to leave any comments below!
Setting Up the PA-200 for Home and Small Office
Labels:
Overview
This document provides a quick-start guide for a home or small office deployment.
Equipment
- Palo Alto Networks PA-200 device.
Note: Other devices, such as the PA-500, can be configured the same way. - Modem that assigns a public IP by DHCP.
- Wireless router, which typically has 4 or more LAN ports and 1 WAN port.
- Three straight-through RJ-45 UTP cables.
Note: CAT5e or CAT6 is recommended for Gigabit Ethernet (GigE) speeds.
Proposed Topology
%20(1).jpg)
Access the WebGUI
- Connect a UTP cable from your computer to the Palo Alto Networks firewall's MGMT port.
- Configure your computer's Ethernet port to have IP 192.168.1.2 and netmask 255.255.255.0. A default gateway is not required.
- Open a web browser and go to https://192.168.1.1, the default credentials are: username: admin, password: admin
Create Security Zones
- Go to: Network > Zones and click Add.
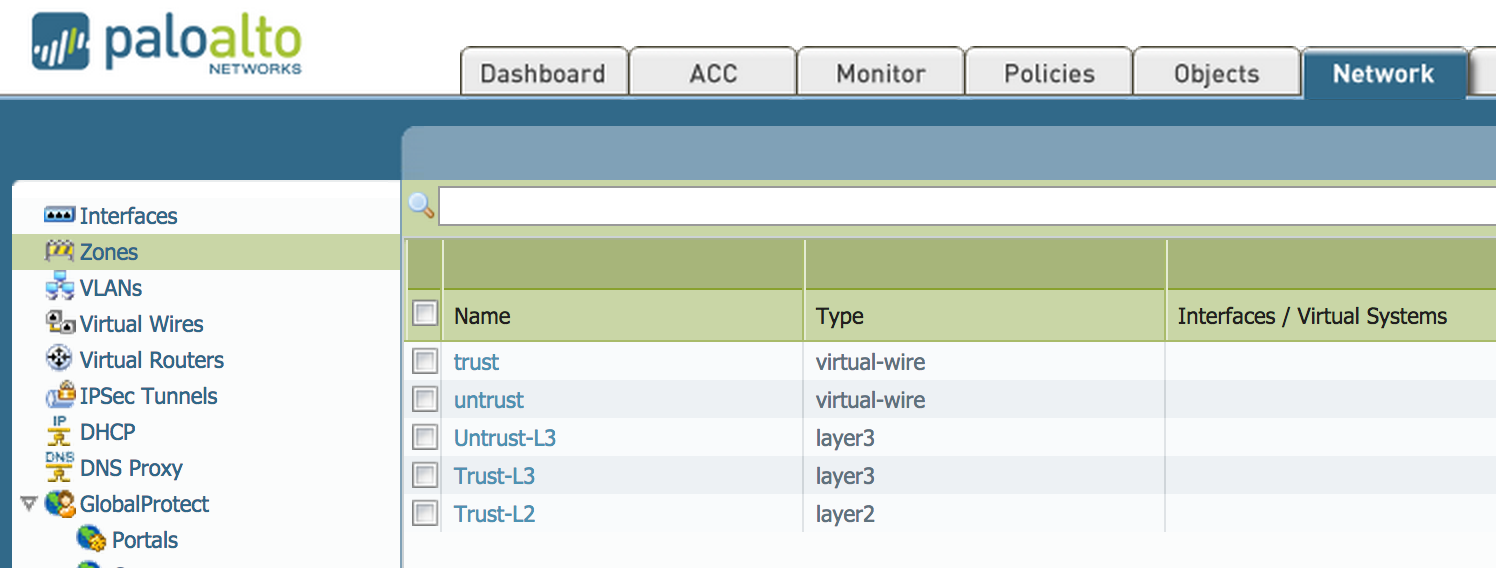
- Create 3 zones:
- Untrust-L3, Type Layer3
- Trust-L3, Type Layer3
- Trust-L2, Type Layer2
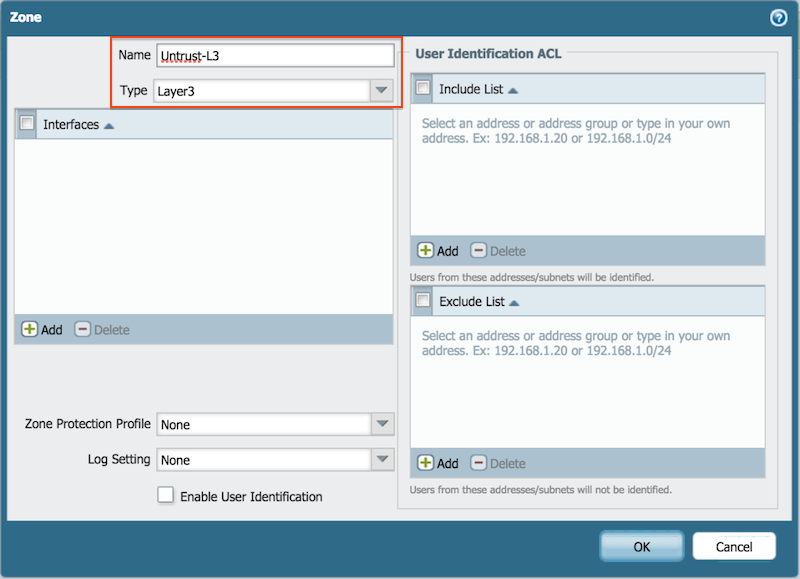
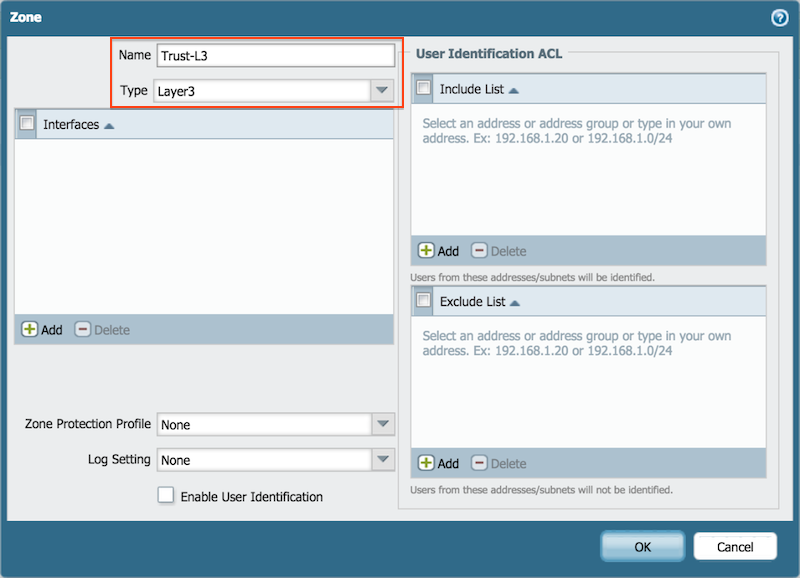
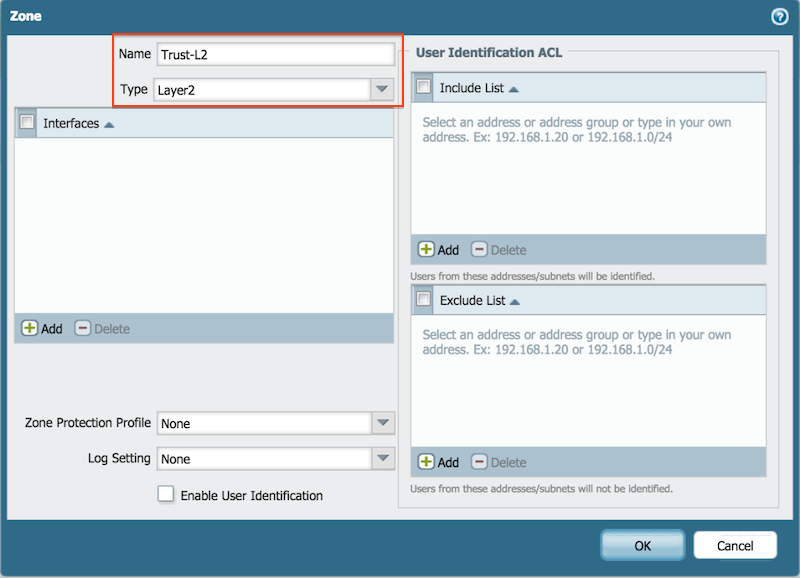
The example shows the resulting configuration:
Connect the ISP Modem to the Firewall
Connect a UTP cable from the ISP modem to the Palo Alto Networks firewall, port ethernet1/1.
- Go to Network > Interfaces on the WebGUI and configure ethernet 1/1.
- On Config
- Configure the ethernet1/1 Interface Type as Layer3.
- Set Virtual Router to default.
- Set Security Zone to Untrust-L3.
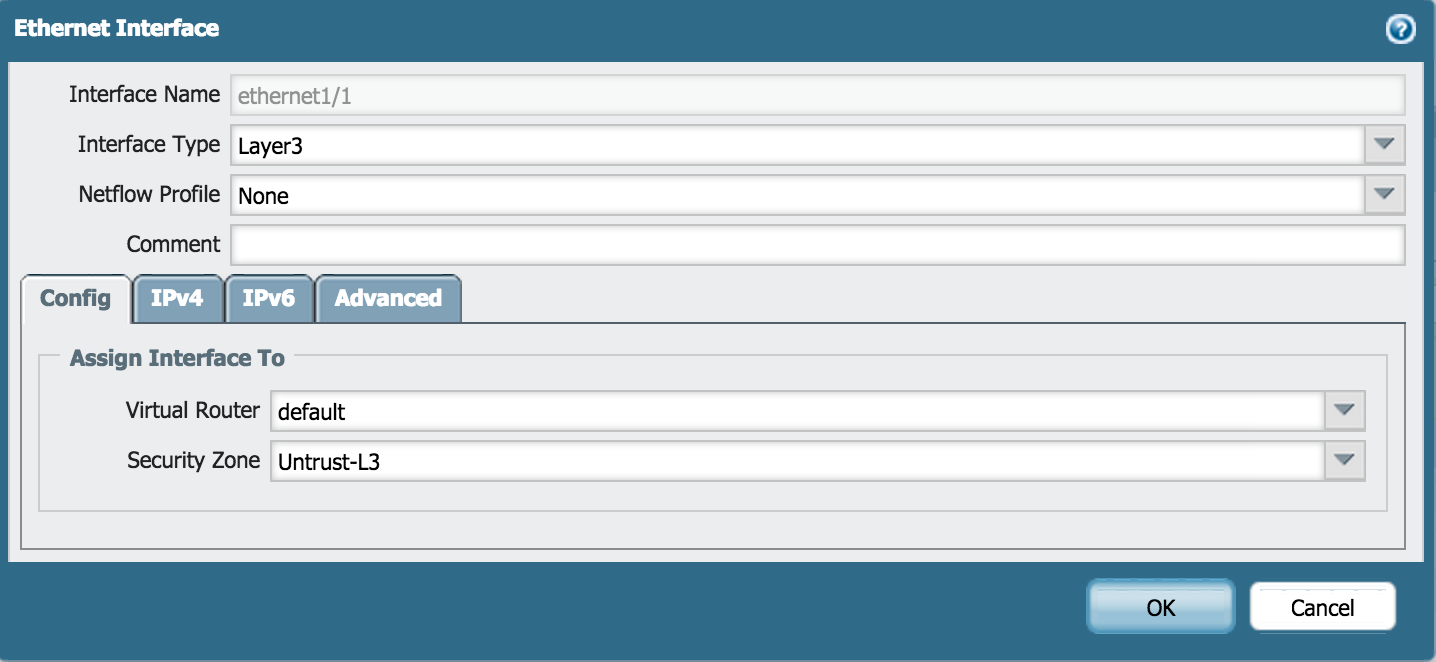
- Under IPv4
- If the ISP provides a modem from which the configuration can be obtained automatically, set the Type as DHCP Client.
Note: When "Automatically create default route pointing to default gateway provided by server" is enabled, a default route is installed in the virtual router, 'default'.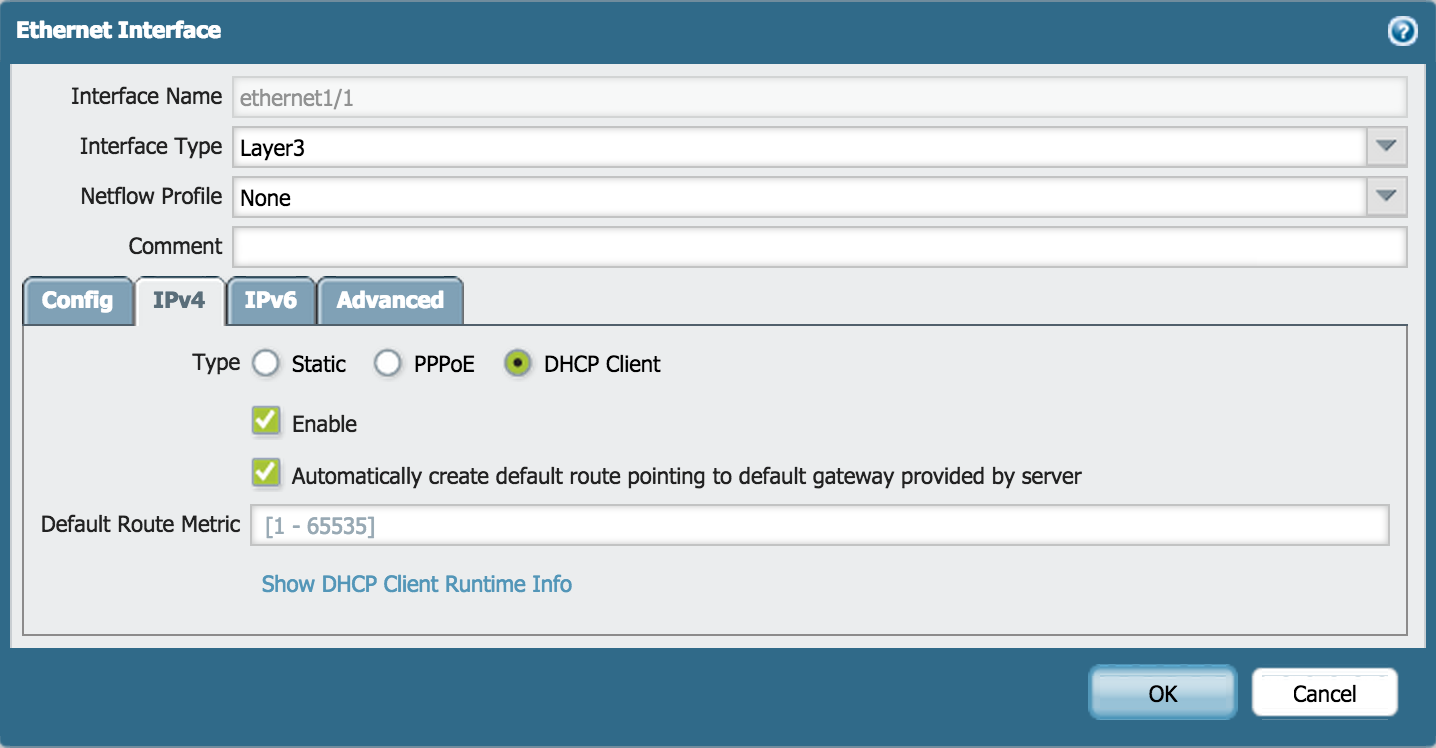
- If the ISP provides a modem that requires manual configuration of static entries, set the Type as Static. Then, add the static IP address/netmask.
For example: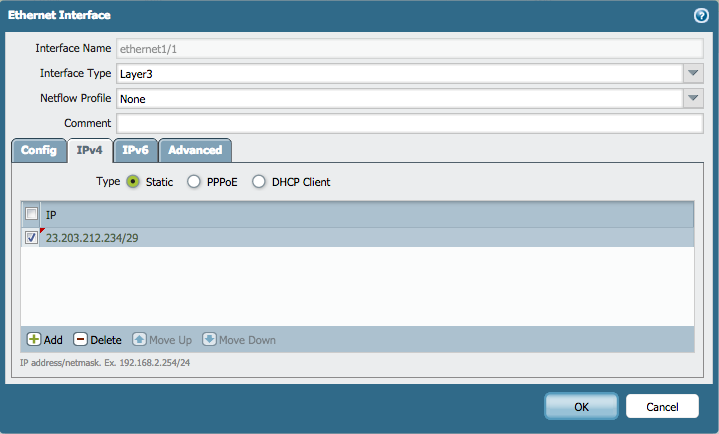
Next, go to Network > Virtual Routers > 'default' > Static Routes > IPv4 and add a static route pointing to the ISP's next hop.
For example: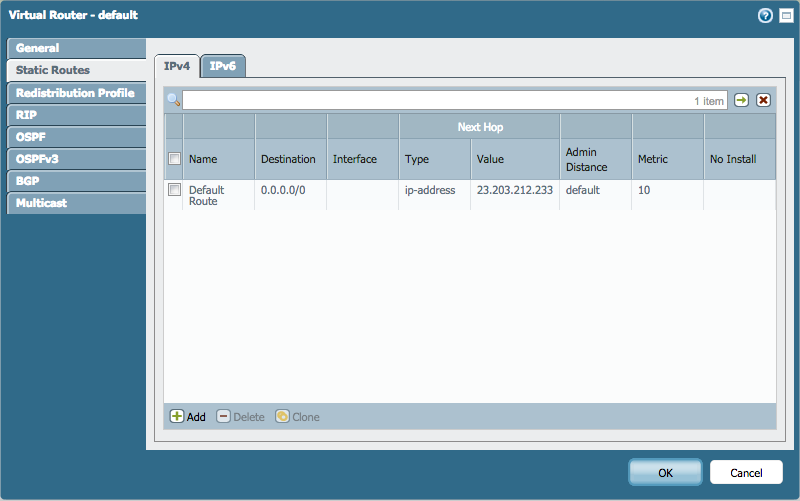
- If the ISP provides a modem from which the configuration can be obtained automatically, set the Type as DHCP Client.
Note: The IP addresses shown in the screenshots are examples only. Use IP addresses assigned by the ISP.
Connect the Wireless Router
General recommendations:
- To avoid a double-SNAT, do not use the wireless router's WAN'or Internet port, thereby using it in a Wireless Access Point'mode.
- The DHCP Server option in the wireless router must be disabled. The new DHCP Server will be configured in the firewall's 'vlan' interface.
- Configure 192.168.1.253 as the wireless router management IP.
- Connect Port 1 of the wireless router to the Palo Alto Networks firewall's ethernet 1/2 port.
Create a VLAN Object
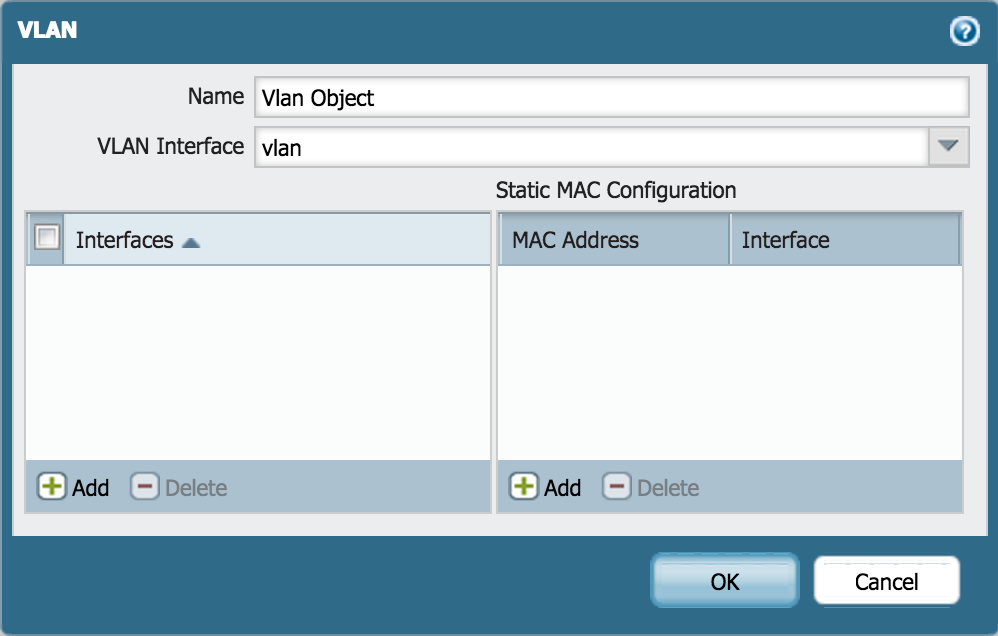
- Go to Network > VLANs and click Add.
- Enter a name and select 'v' for VLAN Interface
Configure the Layer2 Ports and VLAN Object
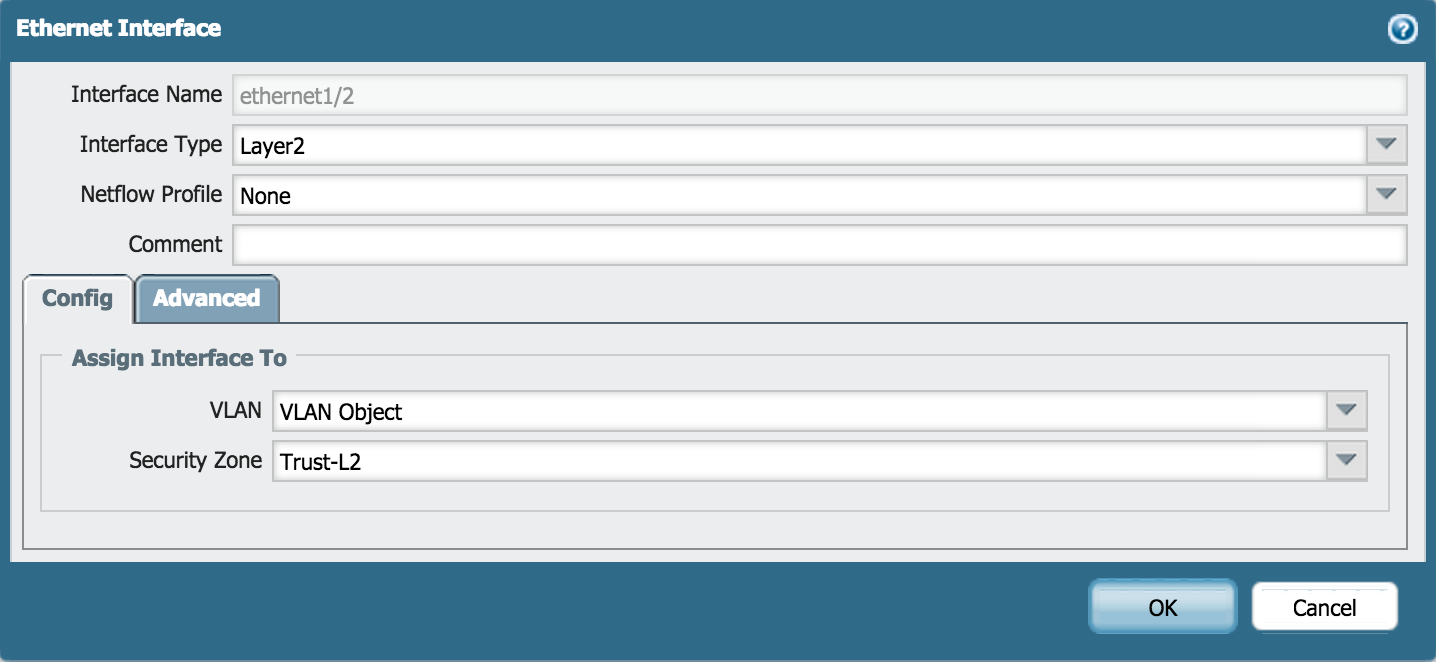
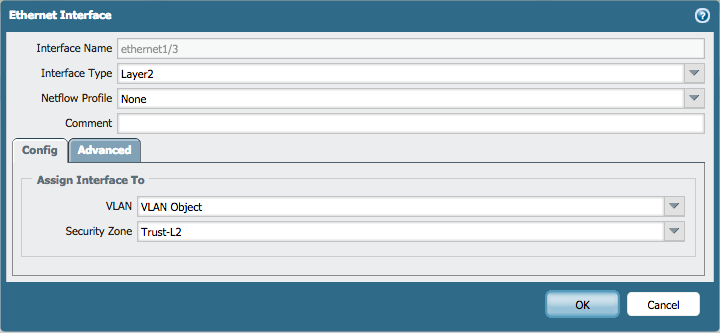
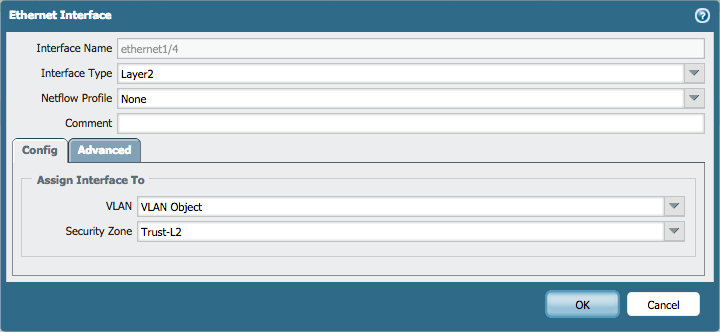
- Go to Network > Interfaces > Ethernet.
- Edit the following settings for the ethernet1/2, ethernet1/3 and ethernet1/4 interfaces:
- Interface Type: Layer2
- Netflow Profile: None
- VLAN: VLAN Object
- Security Zone: Trust-L2
Configure the VLAN Interface
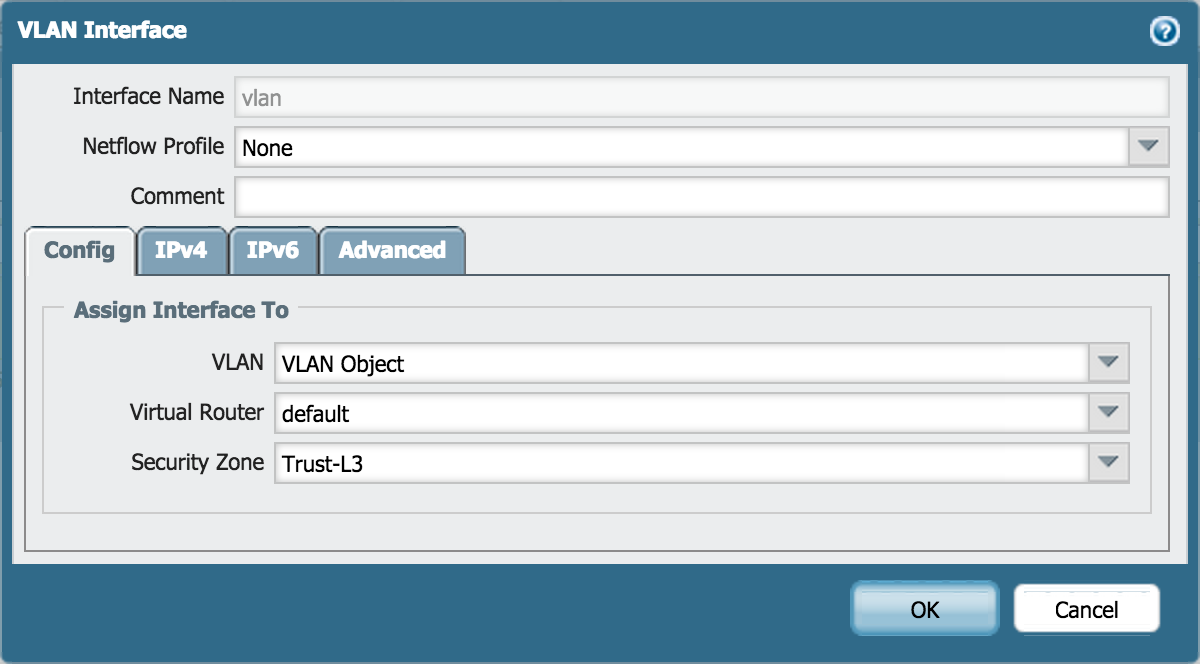
Go to Network > Interfaces > VLAN and edit the following settings:
Config tab
- VLAN: VLAN Object
- Virtual Router: default
- Security Zone: Trust-L3
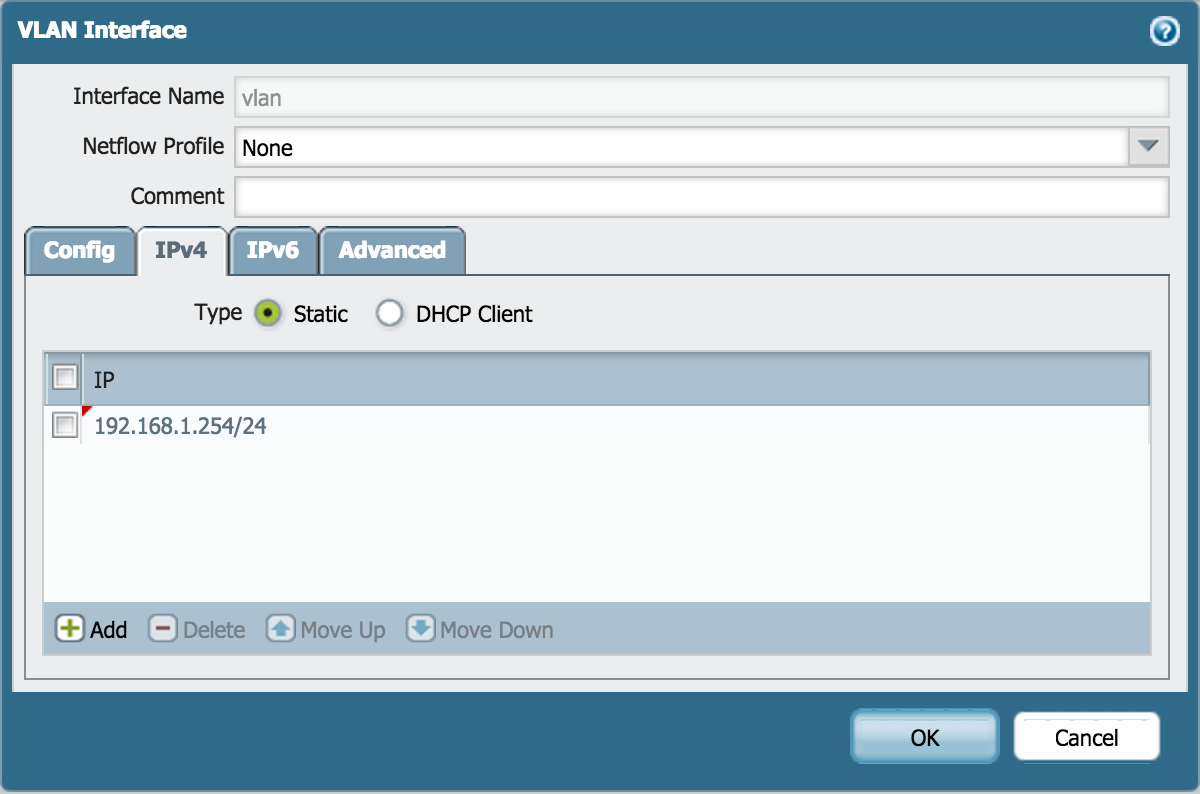
IPv4 tab
Click Add and enter IP address 192.168.1.254/24:

Configure the DHCP Server
- Go to Network > DHCP > DHCP Server.
- Click Add.
- Edit the DHCP Server settings, as shown:
- If the ISP provides a modem where the configuration can be obtained automatically, then the DHCP Server can inherit the configuration that was originally received by the DHCP Client from the ISP. We will then configure an Inheritance Source, with settings obtained from the ISP we want to pass along to the local network.
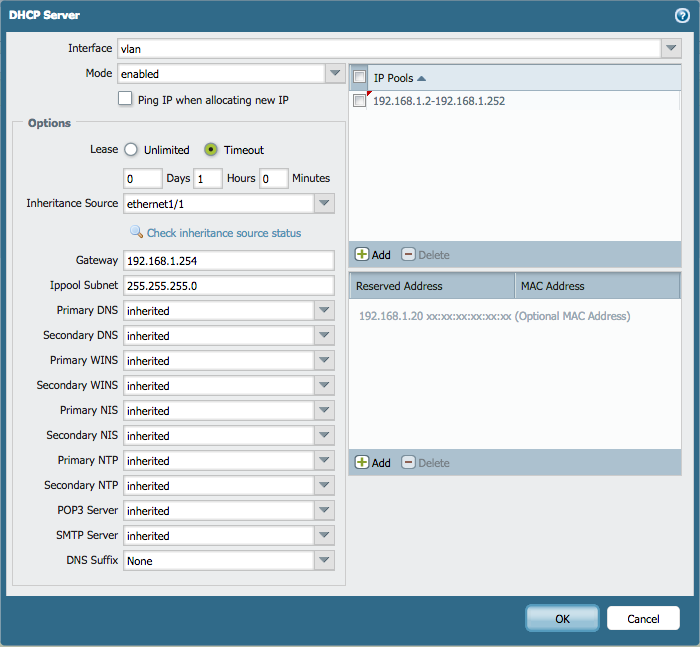
- If the ISP provides a modem that requires manually configuring static entries, specify the settings for the local network.
Note: Public Google DNS servers 8.8.8.8 and 8.8.4.4 are used here as an example. However, we recommend using the DNS servers provided by the ISP.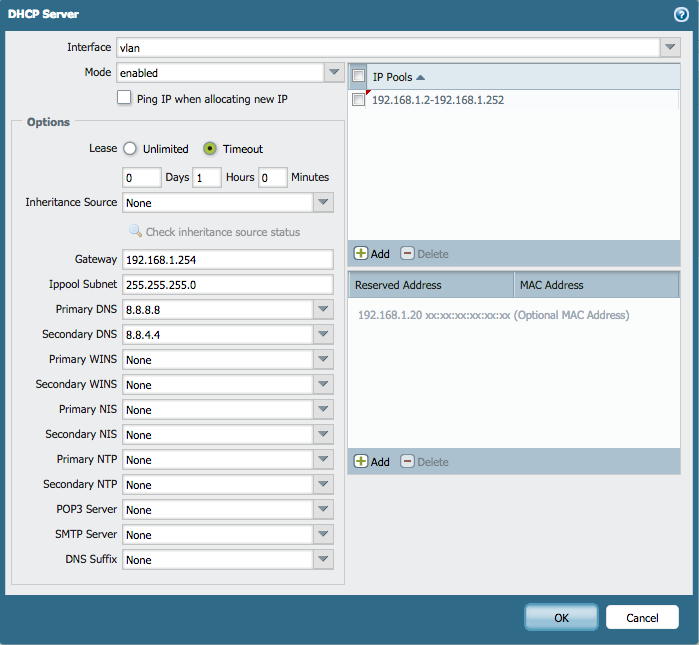
Define a Security Profile Group
- Go to Objects > Security Profile Groups and click Add.
- Edit the following Security Profile Group settings as desired:
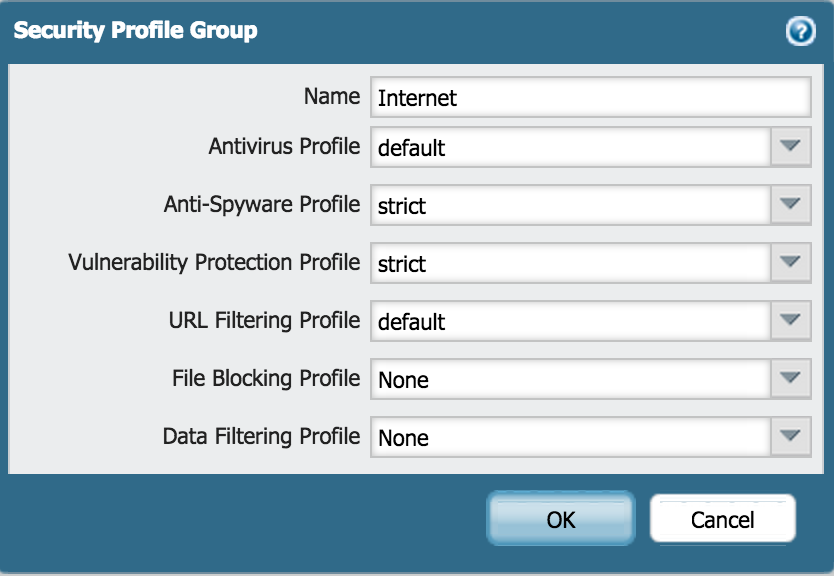
Note: These Profiles are those that come by default with the Palo Alto Networks firewall and have been selected for demonstration purposes. We recommend you take your time to review if the settings for each of the presented selected profiles are appropriate to your setup.
Configure Outbound Internet Security Policy
- Go to Policies > Security and click Add.
- Enter a Name and Description:
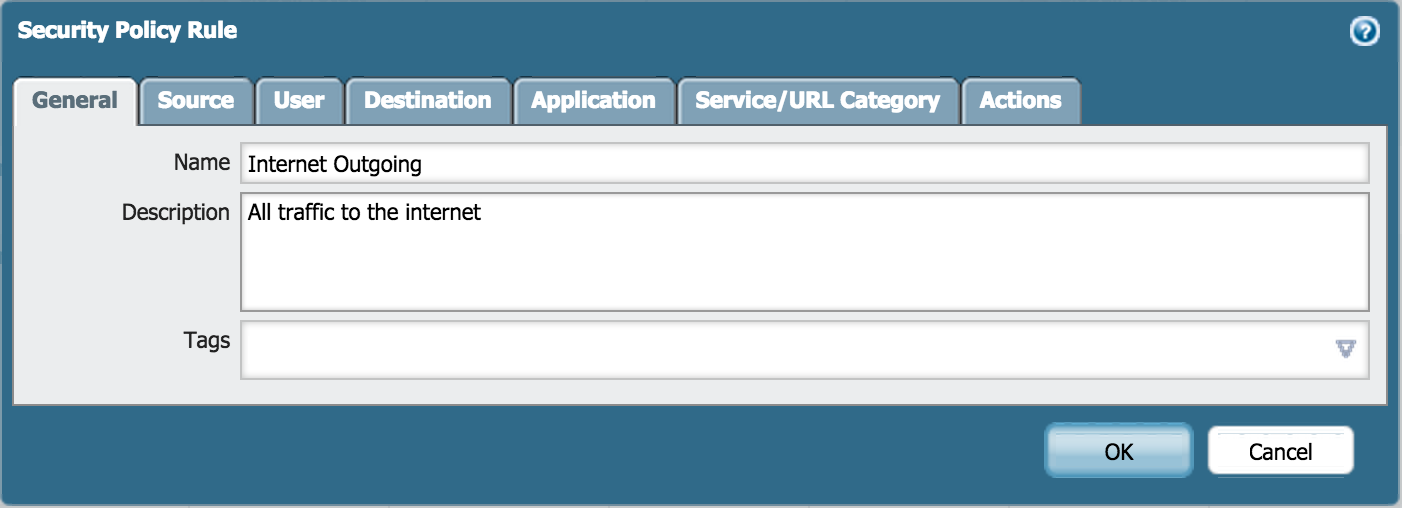
- Add the source zone:
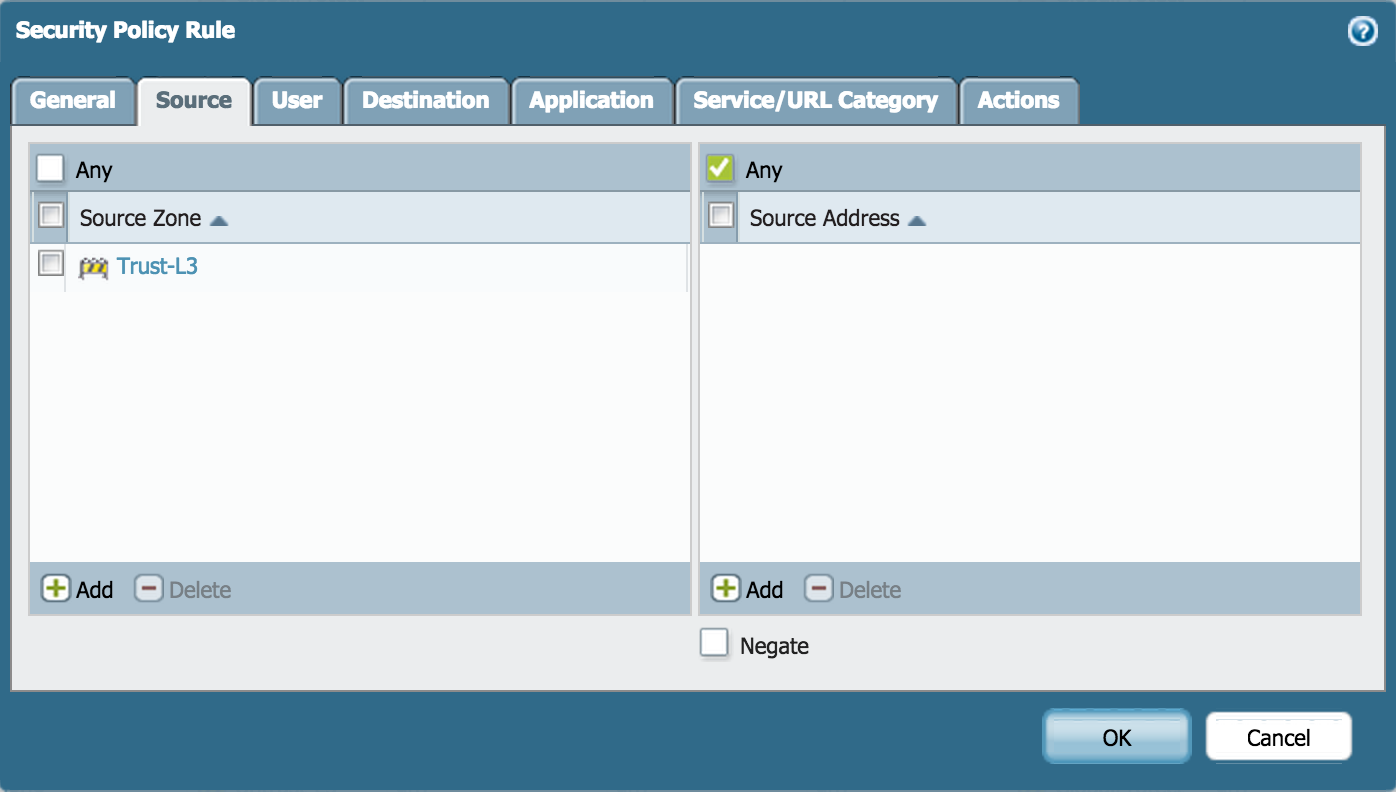
- Add the destination zone:
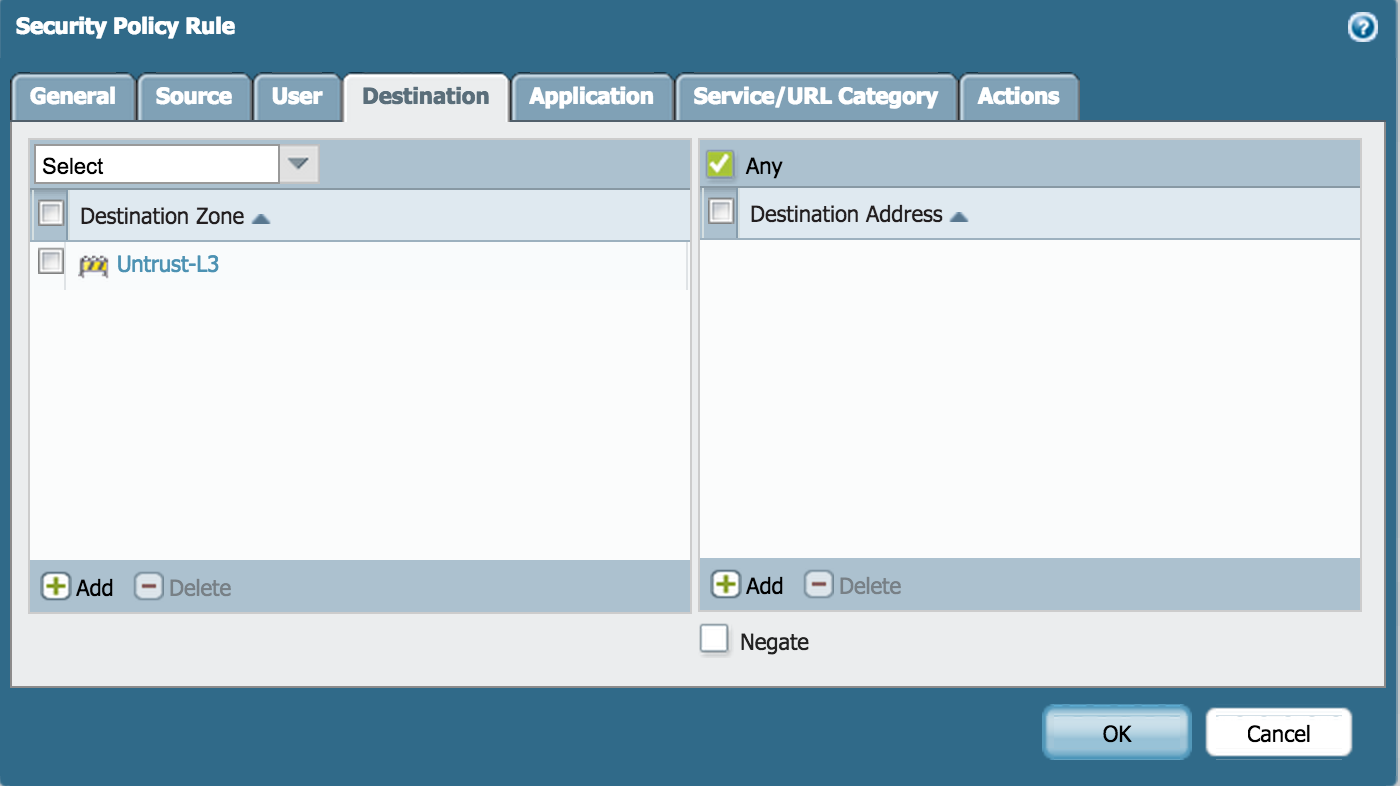
- Specify the action as Allow and complete the Profile Setting:
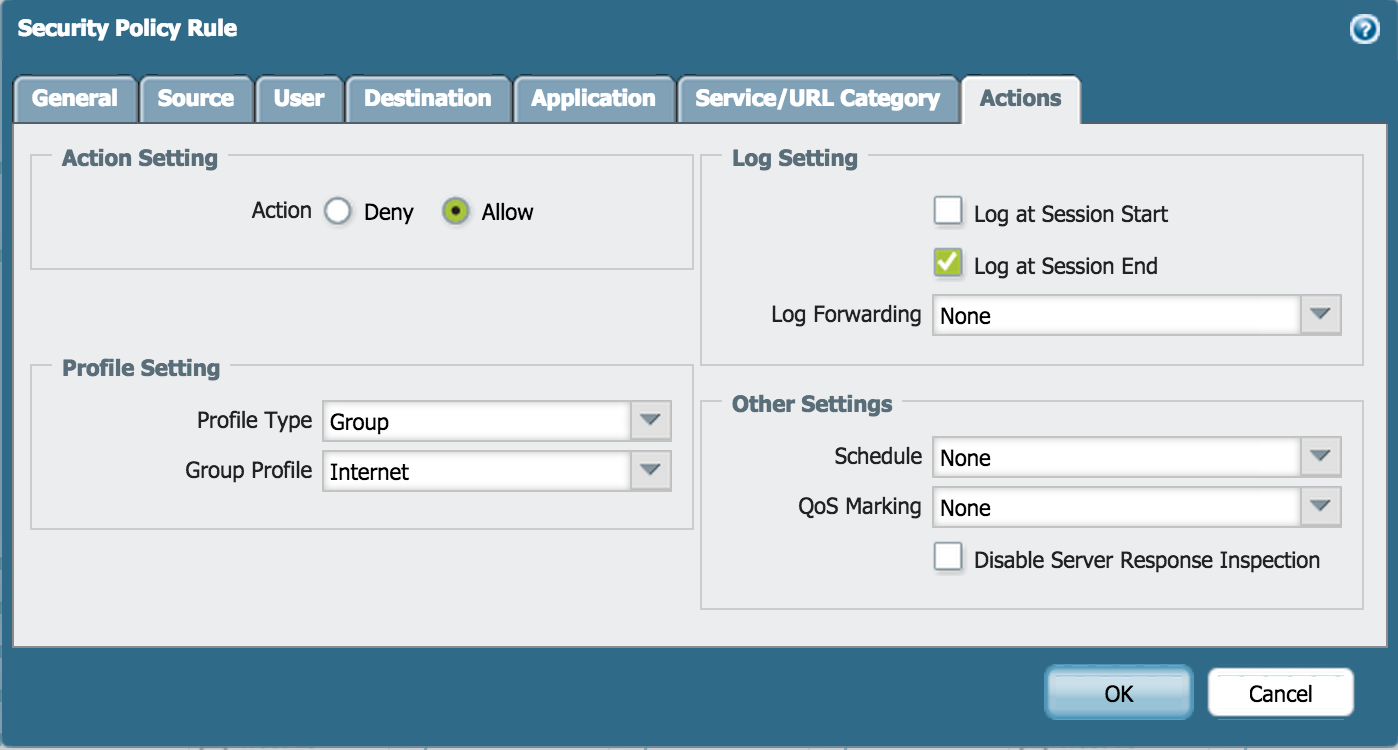
Configure Outbound Internet NAT Policy
- Go to Policies > NAT and click Add.
- Enter a Name and check IPv4 for NAT Type:
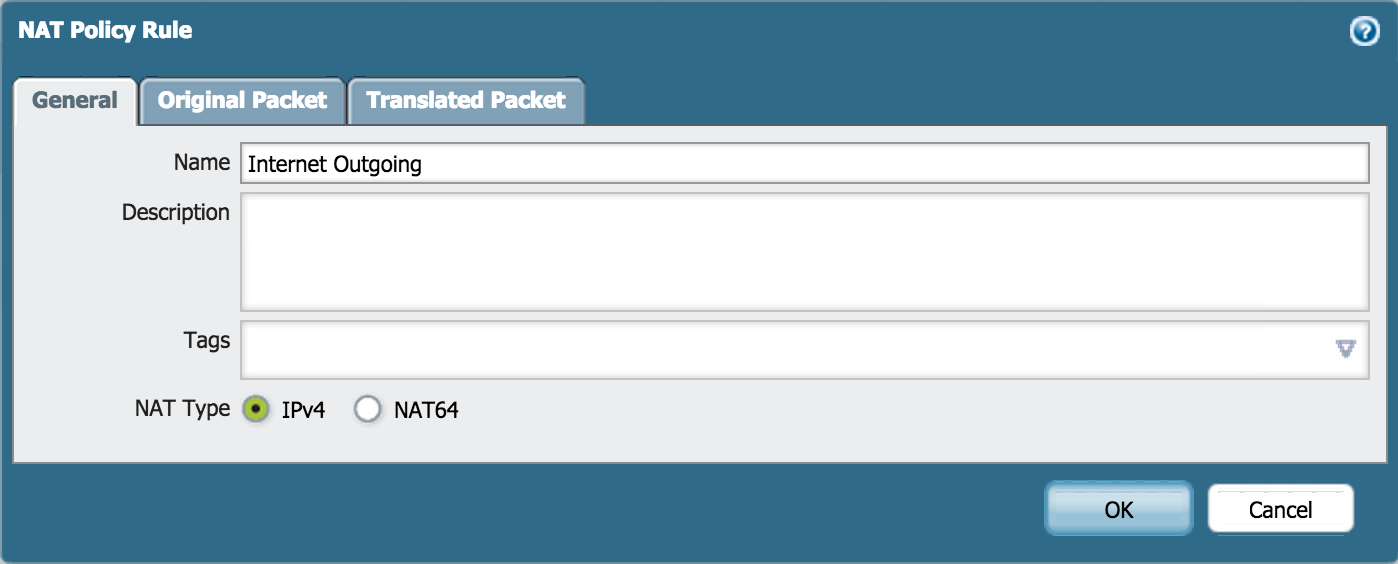
- On Original Packet, specify the Source Zone, Destination Zone, and Destination Interface:
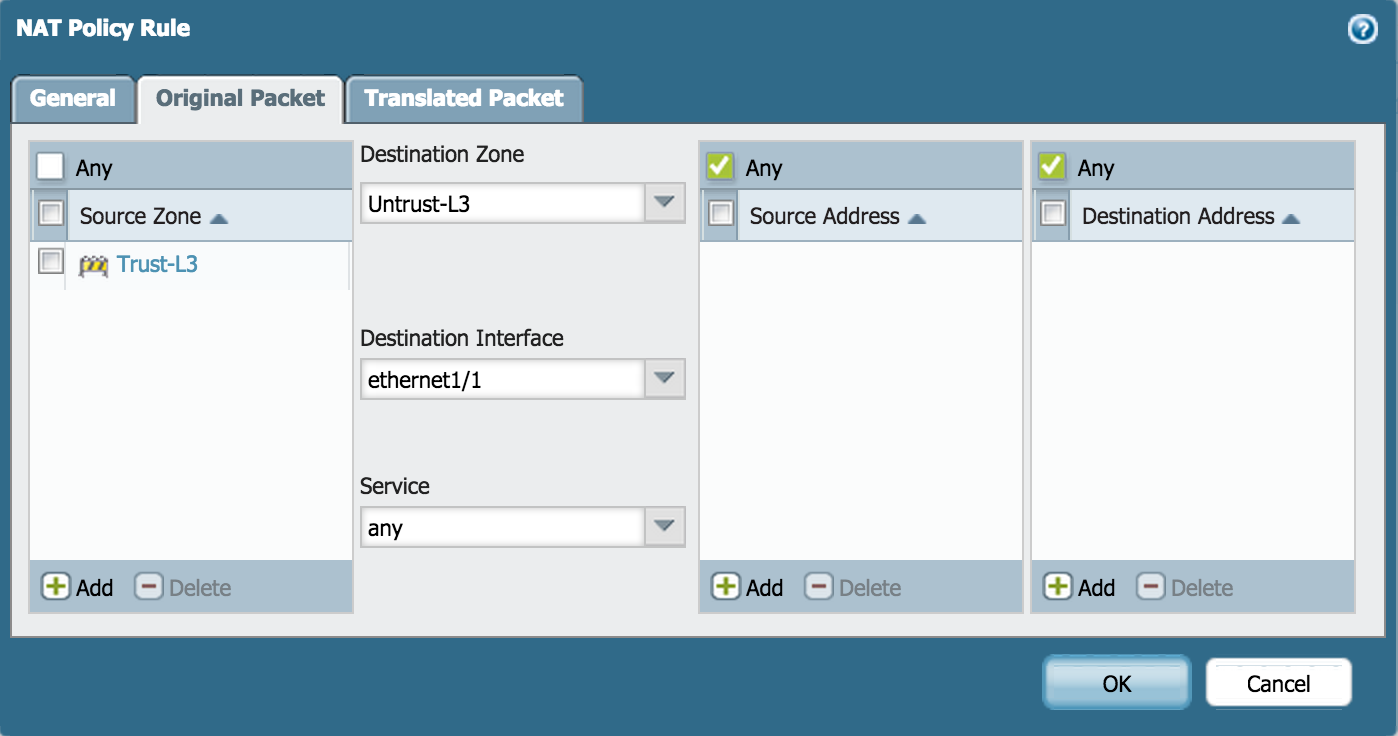
- On Translated Packet, set:
- Translation Type: Dynamic IP And Port
- Address Type: Interface Address
- Interface: ethernet1/1
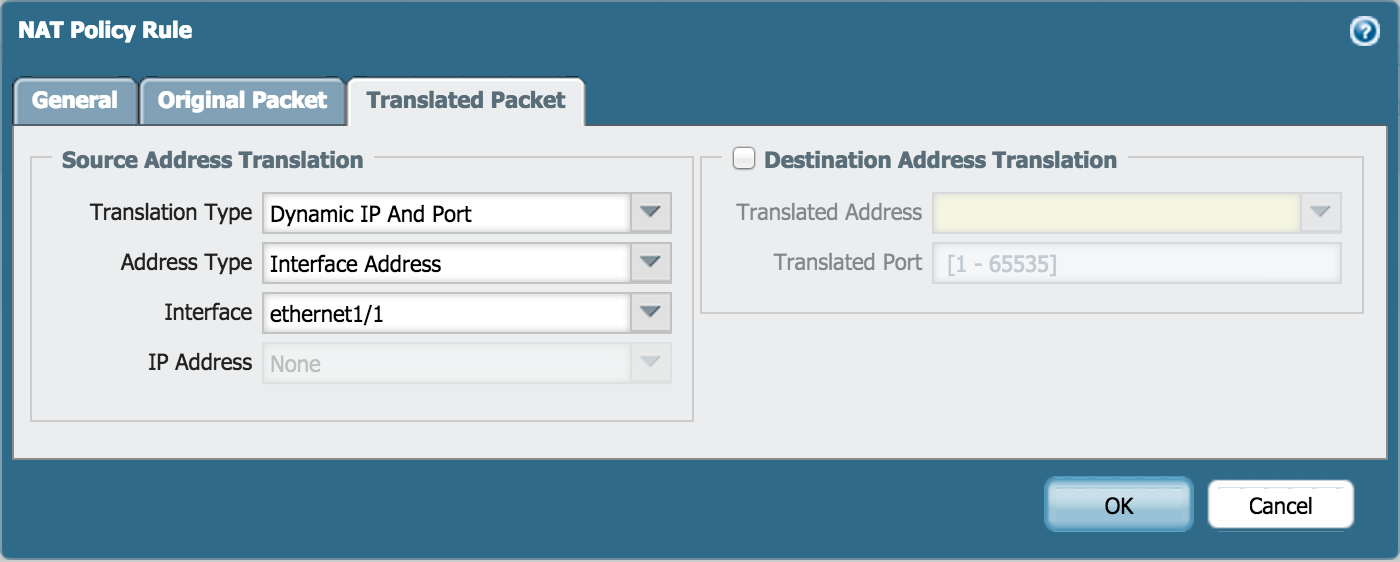
Configure the MGMT IP
Go to Device > Setup > Management and specify the following Management Interface Settings:
- IP Address
- Netmask
- Default Gateway
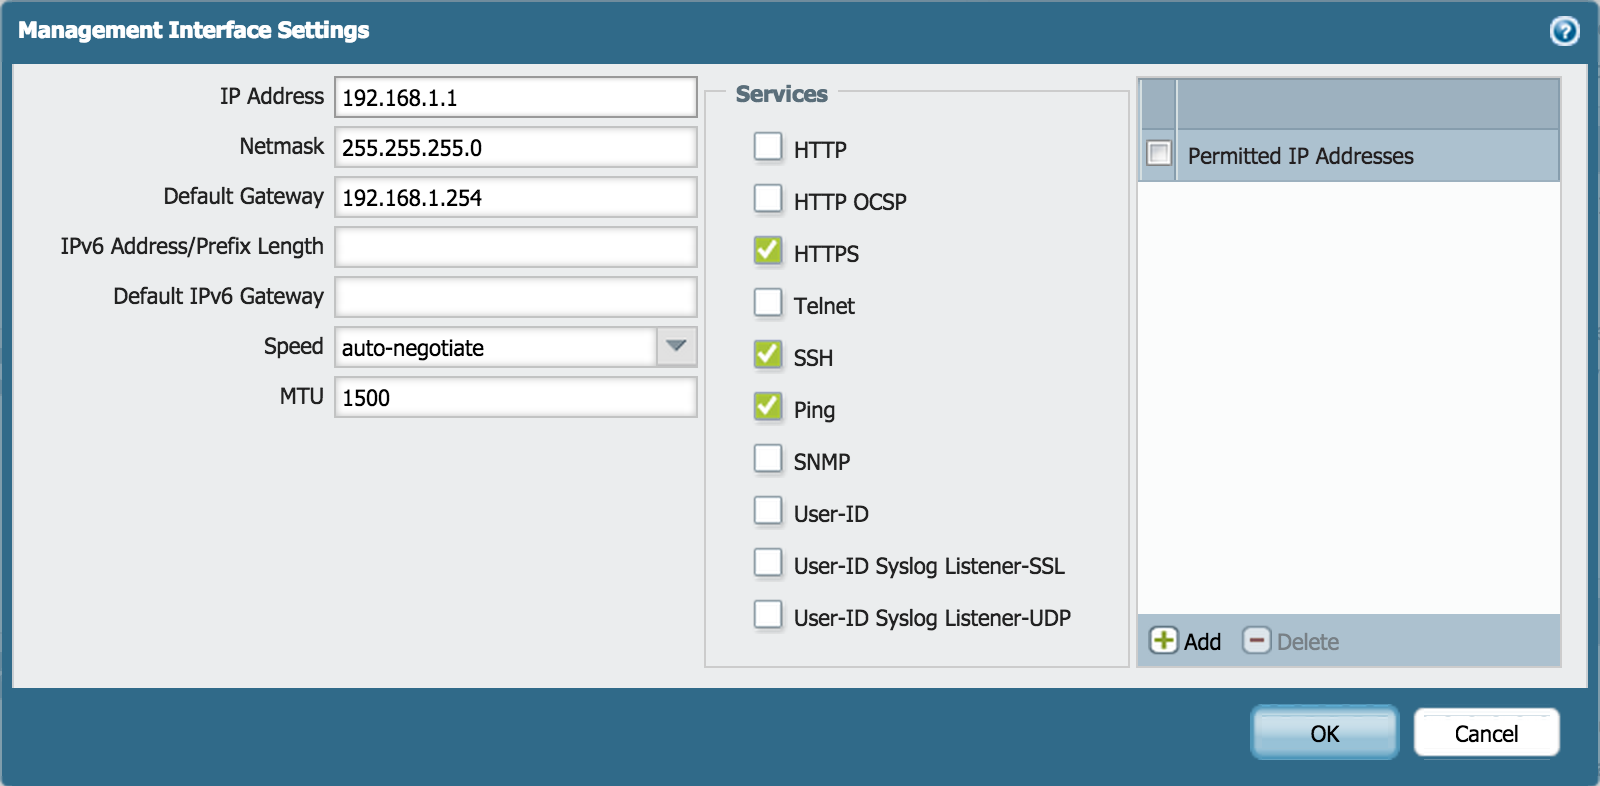
Set DNS for MGMT
- Go to Device > Setup > Services.
- Enter the DNS server IPs. For example: Google DNS IP's 8.8.8.8 and 8.8.4.4.
Note: This should already have been configured to install licenses on the device. If the licenses have not been installed on the device, then the firewall will not be able to reach the license server with these settings.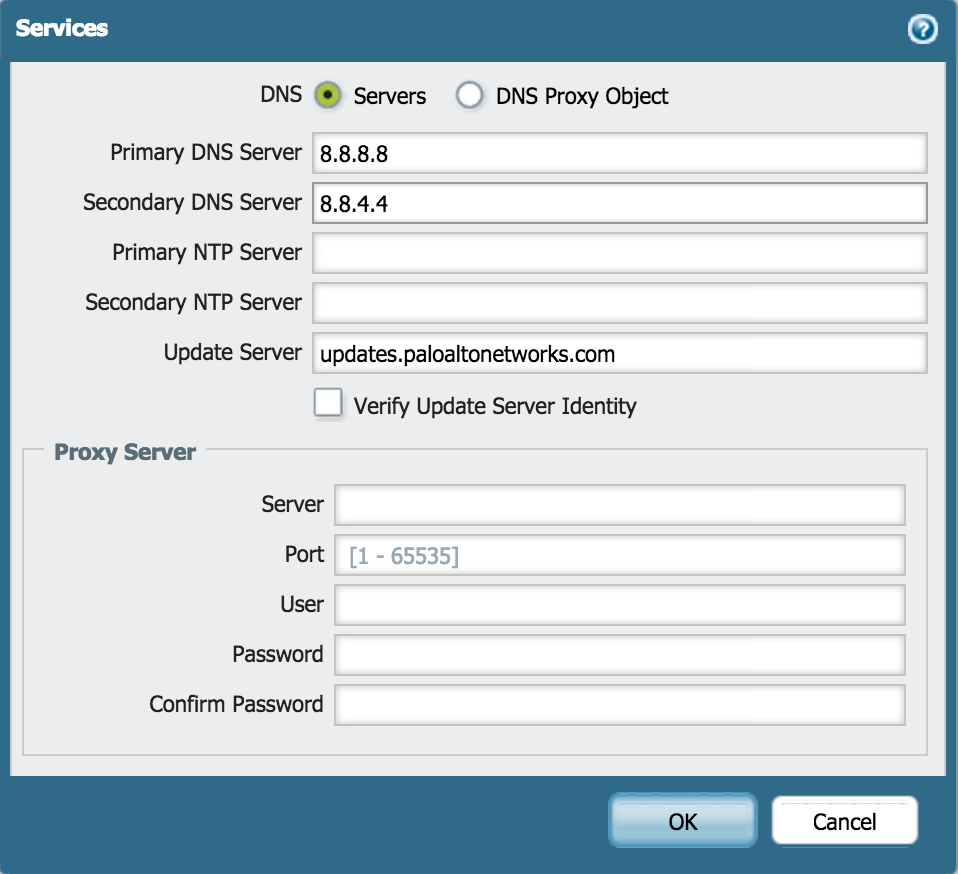
Commit the Changes
Perform a commit to make the changes active as the running configuration on the firewall. The internet modem may need to be restarted in order for it to assign a DHCP address to the firewall.
No comments:
Post a Comment